

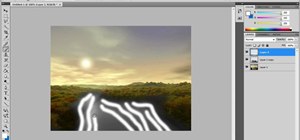
In this video tutorial, viewers learn how to create fog using Adobe Photoshop. Begin by importing the image into the program and duplicate the image. Now go to Filter, select Blur and select Radial Blur. Set the amount to 100, Blur Method to Zoom and Quality to Best. Now select the rectangular marking tool and select the sky. Then open the Hue/Saturation menu and set the Saturation to -100. Use the eraser tool to remove the gray from the edges. Now use the paint tool and paint white streaks on the fog. Finish by going to Filter, select Blur and click on Box Blur. Set the pixel to 21 and customize the Opacity. This video will benefit those viewers who enjoy using Photoshop to edit images, and would like to learn how to create a fog effect in their image.
Just updated your iPhone? You'll find new emoji, enhanced security, podcast transcripts, Apple Cash virtual numbers, and other useful features. There are even new additions hidden within Safari. Find out what's new and changed on your iPhone with the iOS 17.4 update.


2 Comments
when I selected the portion that I wanted to delete with the the square tool, it didn't delete. Is there something I need to hit in order to delete the portion I don't want?
I believe you just need to press the delete key.
Share Your Thoughts