

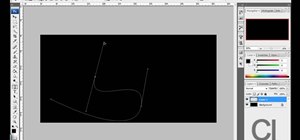
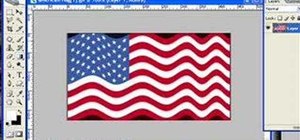
This is really cool, you can make these awesome neon glowing lines using your Adobe Photoshop. This is a fun way to make creative and colorful designs and it looks really neat without spending time working on detailed shapes.
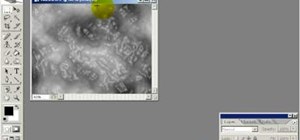
1. Start with a new 400x400 pixel black background. 2. Go to the pencil tool and change your primary color to white. (hit x) 3. Draw 3 straight vertical lines. hold the Shift key to make the lines straight. 4. Go to Filter > Distort > Wave. use the default settings. 5. Duplicate the layer 4 times and set the blending mode for each to lighten. 6. Repeat the Filter > Distort > Wave one time for each layer. Then merge all the layers. 7. Go to Filter > Blur > Gaussian Blur (radius: 3.0 pixels). Then go to Edit > Fade Gaussian Blur. (set the blending mode to screen)Repeat this step two more times. It should end up looking like this. 8. Go to Image > Adjustments > Hue/Saturation make sure you check the "colorize" box (205/100/0). 9. Go to Filter > Distort > Polar Coordinates, click the "polar to rectangular" and hit OK
Just updated your iPhone? You'll find new emoji, enhanced security, podcast transcripts, Apple Cash virtual numbers, and other useful features. There are even new additions hidden within Safari. Find out what's new and changed on your iPhone with the iOS 17.4 update.


Be the First to Comment
Share Your Thoughts