

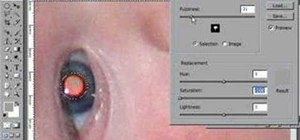
If you have a photograph with an extreme red eye problem, then you will have to take steps above and beyond using the built-in red eye reduction tool in Adobe Photoshop. In extreme cases, red eye will actually contain colors outside of the red spectrum of light. Since the red eye tool only works on this spectrum of light, you will have to manually fix extreme red eye by working on tools that are effective across all different wavelengths of light. The most effective tool at your disposal in this situation is the color replacement tool. First, select the area of the image you will be working on using the selection tool. Then open the color replacement tool, which is found in the "image" menu under the options for "adjustment." Sample the color you want to replace using the eyedropper. Once you have selected the color you want to replace, use the slider in the color replacement tool to reduce the image saturation. This will decrease the range of tones in your sample, which can then be adjusted with the fuzziness slider to select a wider range of the color you want to fix. If you still have not selected all the color you want to fix, use the "add to sample" eyedropper and another round of fuzziness adjustment, if necessary. Finally, reduce the lightness within the color replacement tool dialog box until the selected color looks natural. You can also use the levels tool, which provides basic contrast adjustment within a range of tones, to further tweak your result until it looks the way you want it to look.
Just updated your iPhone? You'll find new emoji, enhanced security, podcast transcripts, Apple Cash virtual numbers, and other useful features. There are even new additions hidden within Safari. Find out what's new and changed on your iPhone with the iOS 17.4 update.


Be the First to Comment
Share Your Thoughts