

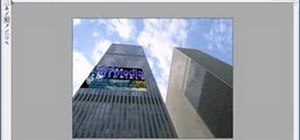
Rescue the sky in your pictures. Sometimes, the blue sky and the white clouds are the most exhilarating part of a photograph, so making sure it's as vivid as it is in real life is key to having a good pic. To do this, you'll need to do some touchup work in Photoshop.
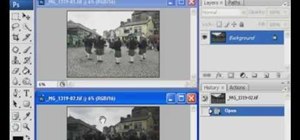
This video tutorial will show you the steps necessary to get the perfect sky look. Learn how to rescue the sky by combining two exposures in Photoshop. There's basically five easy steps to combine two shots (one exposed for the sky and one exposed for the ground) so that you end up with the best parts of both combined into one image.
Having your pictures in RAW format makes them easier to manipulate in Photoshop, but if you don't have a digital camera with RAW capabilities, you can shoot handheld, using automatic bracketing and being very sure not to move between shots, or you can use a tripod to get both the exposures.
Just updated your iPhone? You'll find new emoji, enhanced security, podcast transcripts, Apple Cash virtual numbers, and other useful features. There are even new additions hidden within Safari. Find out what's new and changed on your iPhone with the iOS 17.4 update.


Be the First to Comment
Share Your Thoughts