This video shows the method to do weight loss using Photoshop. Open the image and go to 'Filters' and 'Liquify'. Click on the 'Forward Warp Tool' on the left. Zoom into the back area and drag the mouse in towards the body to make it thin. Keep the 'Brush Pressure' high to get a sharp result. 'Brush Size' determines how large the brush is and the area affected by it. Use the 'Pucker Tool' and click on the ass to reduce it. Reduce the sides of the ass with the 'Forward Warp Tool' and reduce the...
Going to miss the fireworks extravaganza this Fourth of July? Doesn't mean you can't fake the experience, and that's exactly what we're going to do here—in Photoshop. You're going to learn how to take any night photograph and insert fireworks into it. It's the next best thing to watching some fireworks display firsthand.
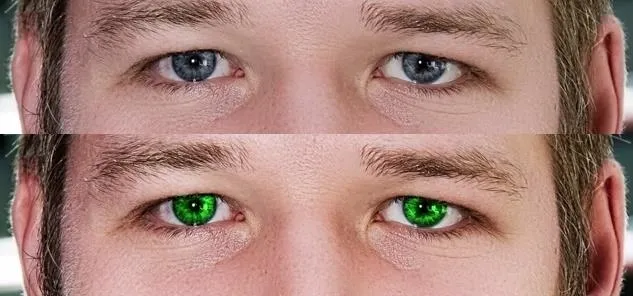
With Adobe Photoshop on your computer, it's super easy to change or adjust the skin tone of somebody in a digital photo. The process uses some basic selection and color adjustment tools, and it's a fun way to make a friend's face nauseously green or lessen the effects of overly strong, sometimes even orange, makeup.
If you're an actress, dancer, or singer (or maybe all of the above), there's nothing more flattering than seeing your name on a marquee, especially if it's the first one listed. You can also get your name lit up in lights by creating this marquee in Photoshop.
Bert heads to the dark side and teaches you how to create a reptile-like evil eye in Adobe Photoshop. Be afraid. The reptile-like evil eye's texture are created by using various photoshop filters - Radial Blur, Liquify, Texturizer, Craquelure. Carefully watch and learn how to create your own evil eye.
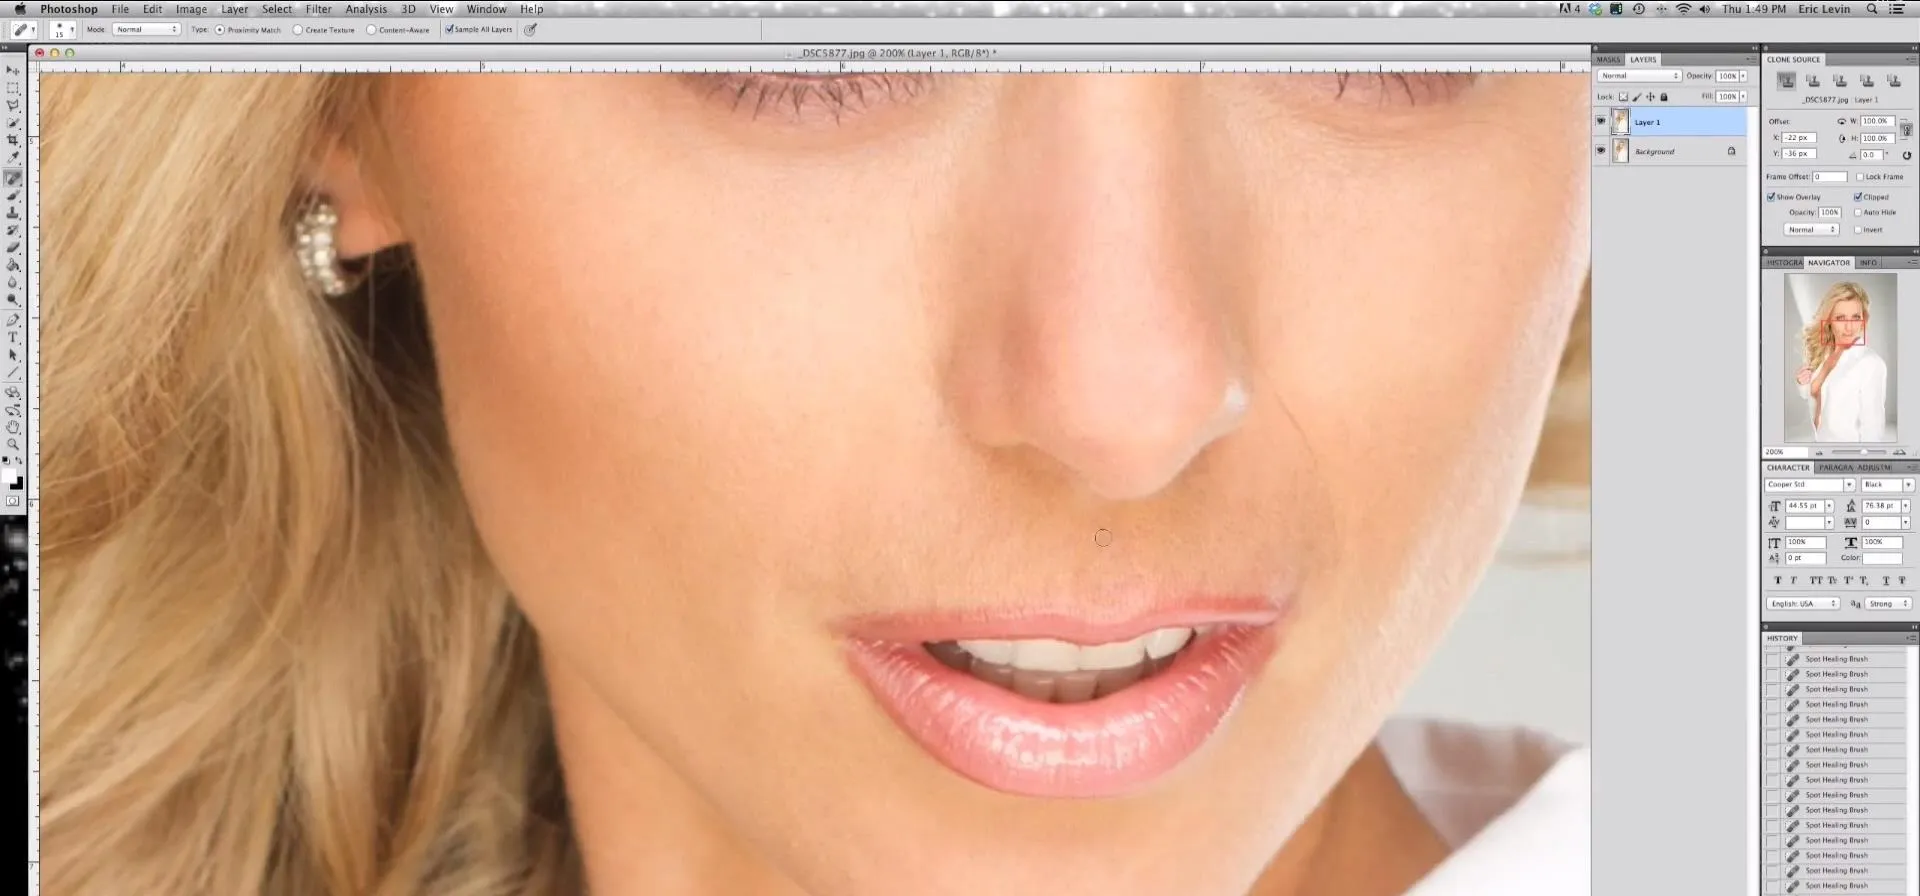
Photoshop wizard Bert Monroy shows you how to use Photoshop's cloning tool to remove people, places and things from your photos. Eliminate modern elements from your streetscapes to make them look old. This Photoshop tutorial shows you how.
If you loved The Da Vinci Code by Dan Brown, then listen up— there's been a new discovery found hidden within Leonardo da Vinci's most famous painting— the Mona Lisa.
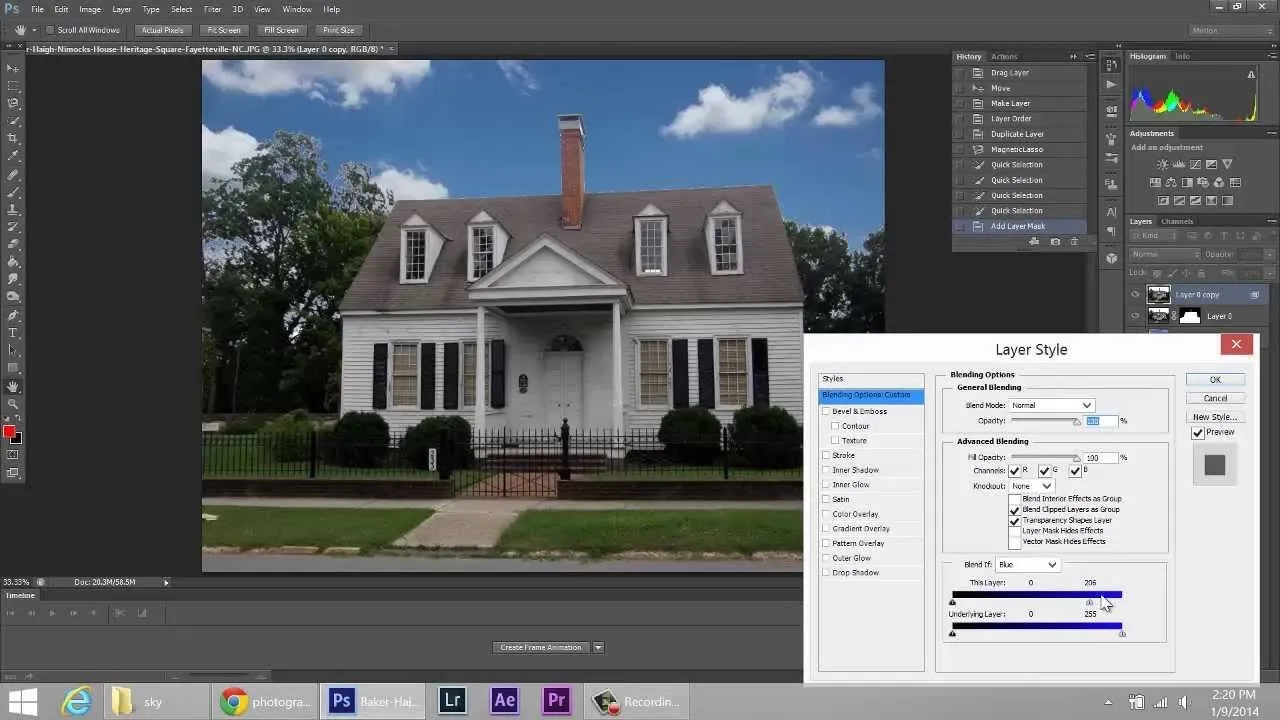
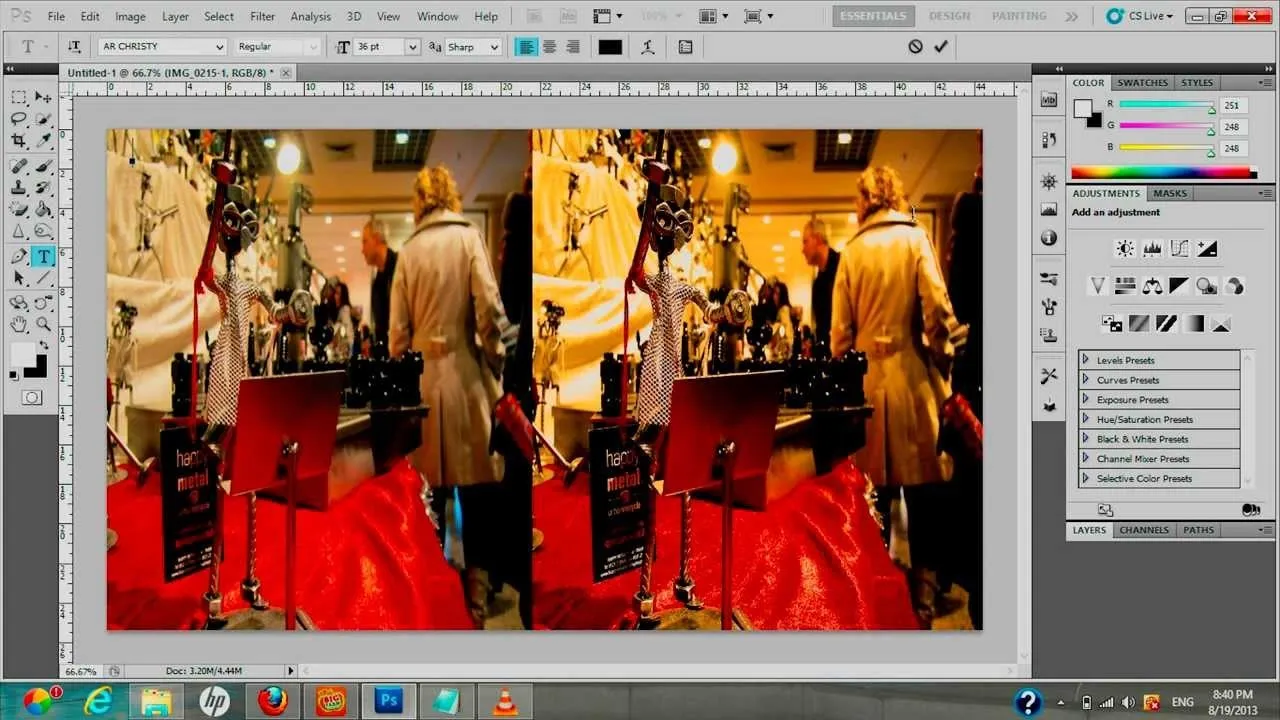
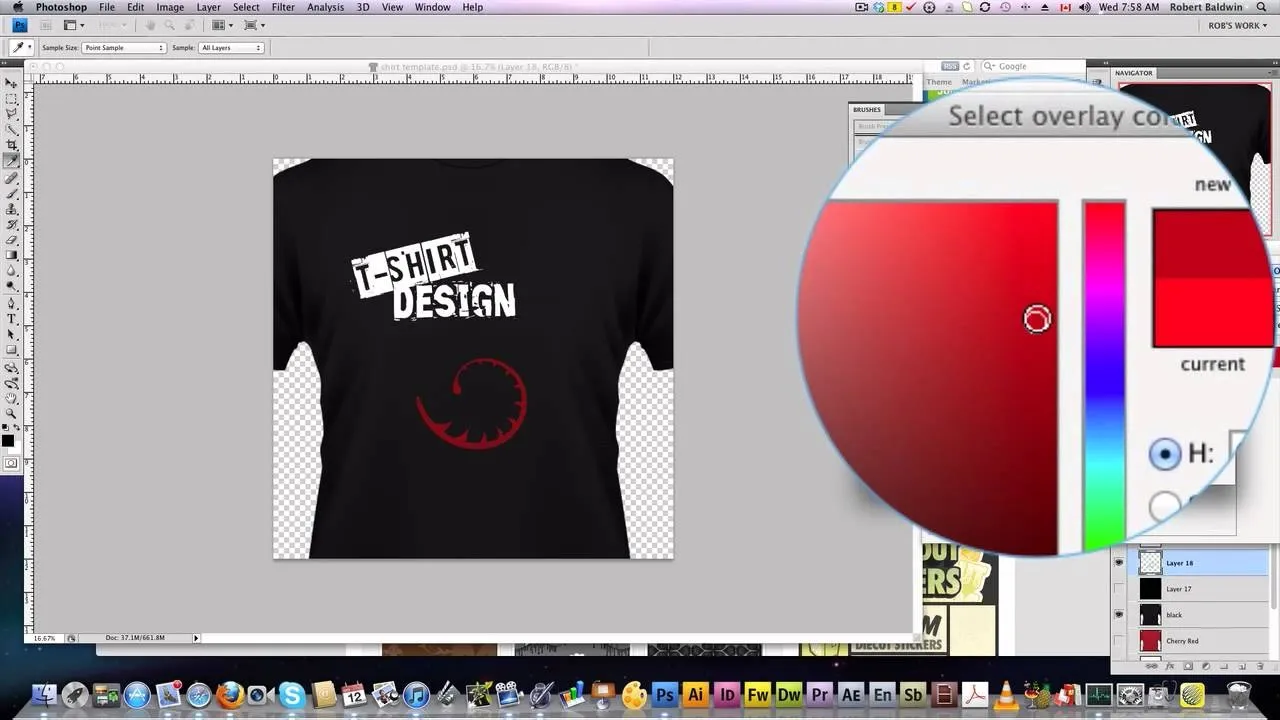
In this tutorial, you will learn how to make advanced hair selections using the alpha channels. And how to blend two different images together, using advance masking and the adjustment layers.Thanks for watching this video
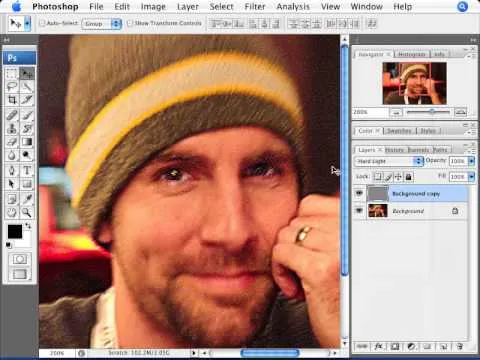
We had basic studio lighting, speed lights and photo shoots. This week The Elevin Show takes us on a Photoshop blitz to teach us a few skin retouching tips and tricks on Photoshop.
It's very easy to get a slightly blurry photograph due to a moving subject, camera shake, or just an incorrect auto-focus, but you don't have to let that ruin an otherwise terrific picture. All it takes is a little finesse in Photoshop or another photo editing software. This guide covers sharpening a blurry image using Photoshop specifically.
In Adobe Photoshop CS5.1 there are several ways to perform same action. I make a video tutorial in which you can learn that how to combine two images to perform your different operations. I used a very simple and quick method. To follow my method you can get a quick adjustment of two or more then two images just in single frame and get the result you desire.
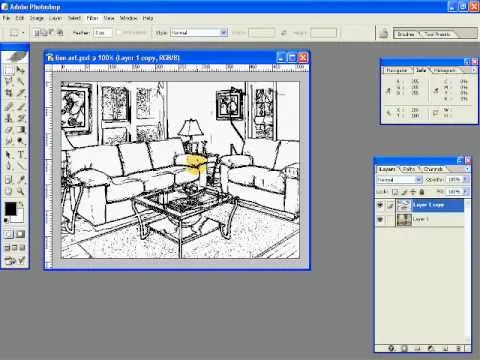
If you're not much of a drawer, you can still get the look of a detailed drawing simply by taking a picture and using Photoshop's tools and filters to transform it into something that looks drawn by hand.
Looking to become a Photoshop expert? Take a look at our first photoshop tutorial which teaches users and students how to change the color of a jacket in just two minutes. Apply this new photoshop tool to all your photo edits to turn dull colors into fresh, bright ones quickly and easily. Message us if you would like to see more Photoshop tutorials.
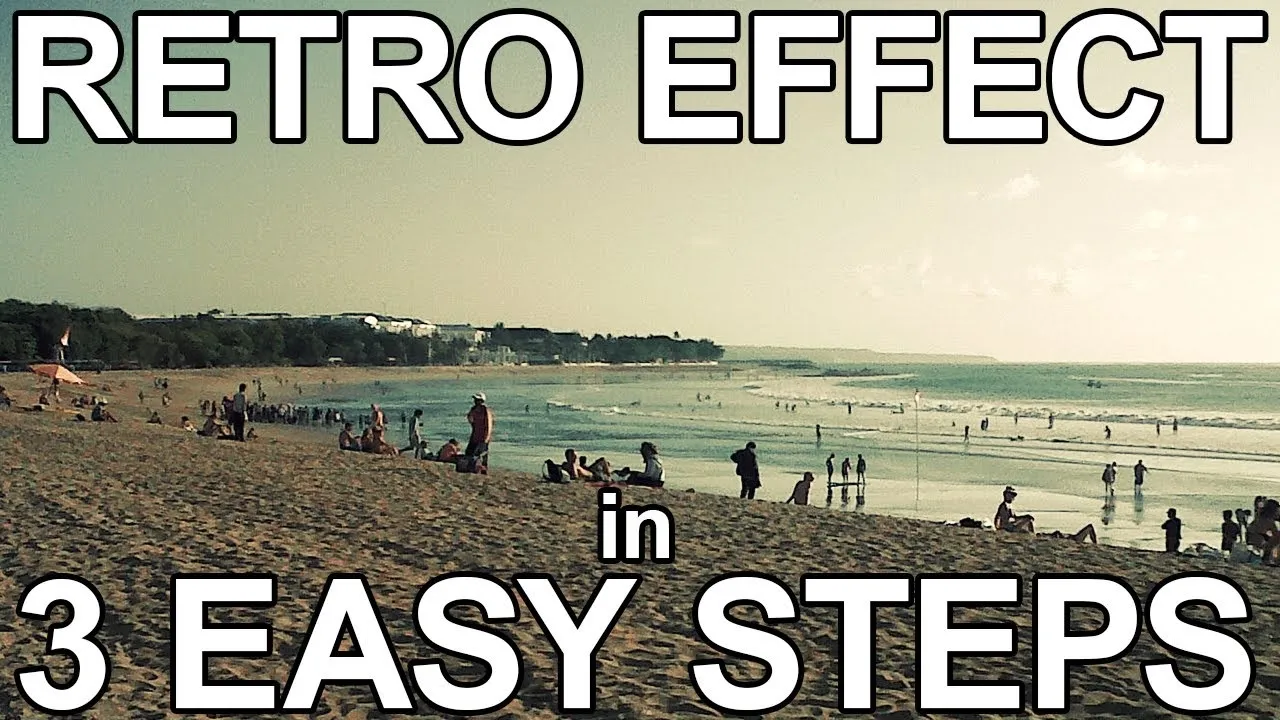
It's very popular thesedays to use a old looking Vintage effect on photos. I do it myself with Photoshop a lot and for me it's simply the explanation, that the retro optic of an old camera justs awesome.
I'll show you in this Video Tutorial how you add new Brushes to your Photoshop CS6. There is a wide variety of Brushes for Photoshop. Most Designs contain New Photoshop Brushes.
Photoshop Actions are great because someone else has done ALL the work for you and all you have to do is click play and watch the design come to life: watch this tutorial on installing and using Photoshop Actions
Zoom burst photography is an effect that makes it look like you're moving towards the subject. Traditionally, it's done with a zoom lens and an open shutter, but like most other effects, it can also be done in Photoshop.
In the new Photoshop CS4, there are some minor improvements to the Photomerge function, including the new collage option. Jay Kinghorn goes over the different ways of bringing your images into photomerge, the layout options, and some quick tips for creating better quality panoramas in Photoshop CS4. The following how-to video walks you through the entire process.
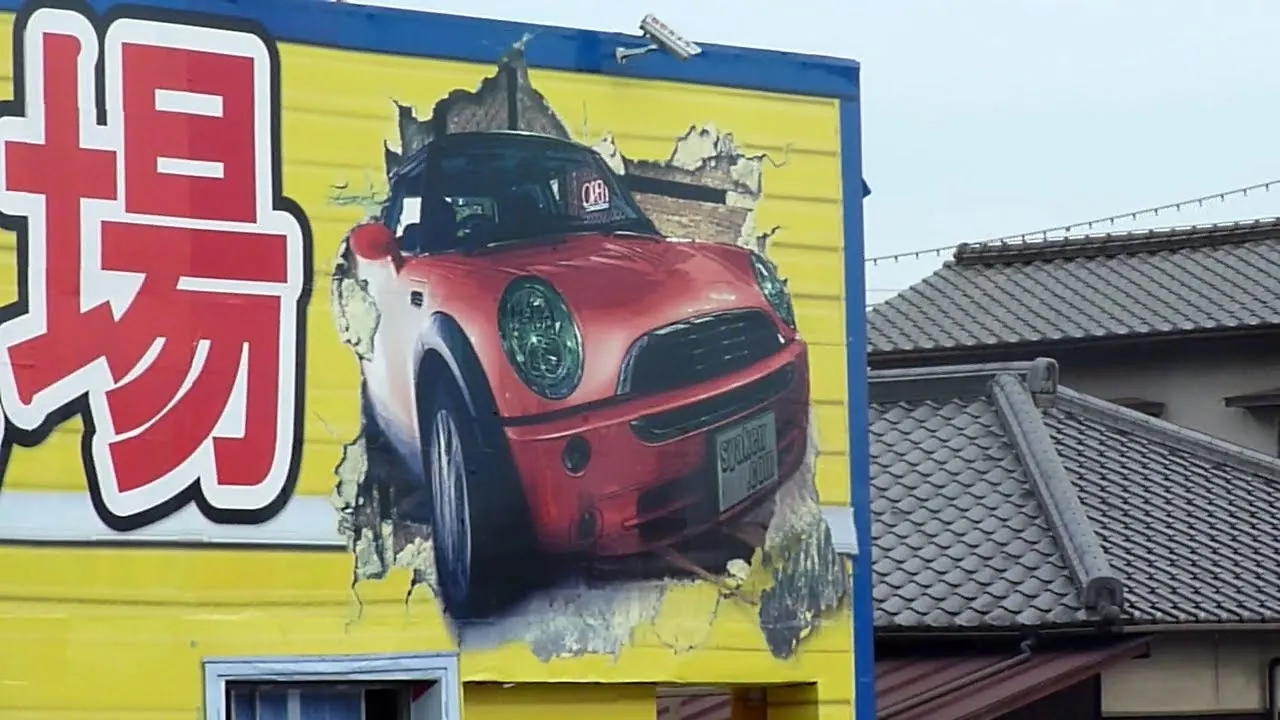
Here is how I made large format banner on a building. I drew a car penetrating out of a wall on a big canvas. I designed , printed ,and pasted it with my friends. it took me 200 meter rolls of sticker sheets and big loads of ink.
Create crazy looking images by 'unzipping' a person or object using Adobe Illustrator to create the zipper and then adding it to an image in Adobe Photoshop. Your tools in Illustrator will be the basic shape tool, the brush pallet, and a transform filter. In Photoshop you'll need to use the select, puppet warp, and paintbrush tools.
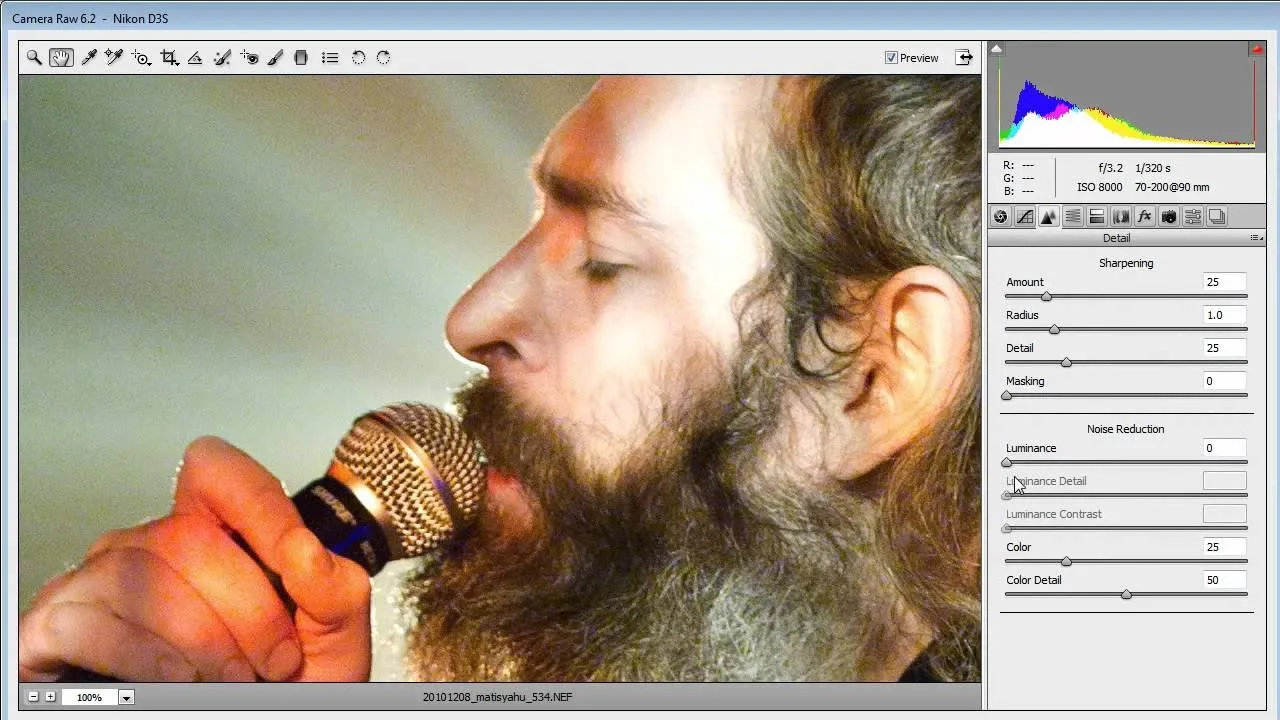
If you're new to Adobe Photoshop, editing photos can be a bit intimidating, especially when dealing with raw file formats. But with the help of this Photoshop tutorial, you'll be able to fix up your raw photos without any problems. Gavin Hoey walks you through his steps of Camera Raw in CS5, using an awesome picture of Matisyahu as an example, tweaking and fixing the pic using the crop, white balance, temperature and noise tools.
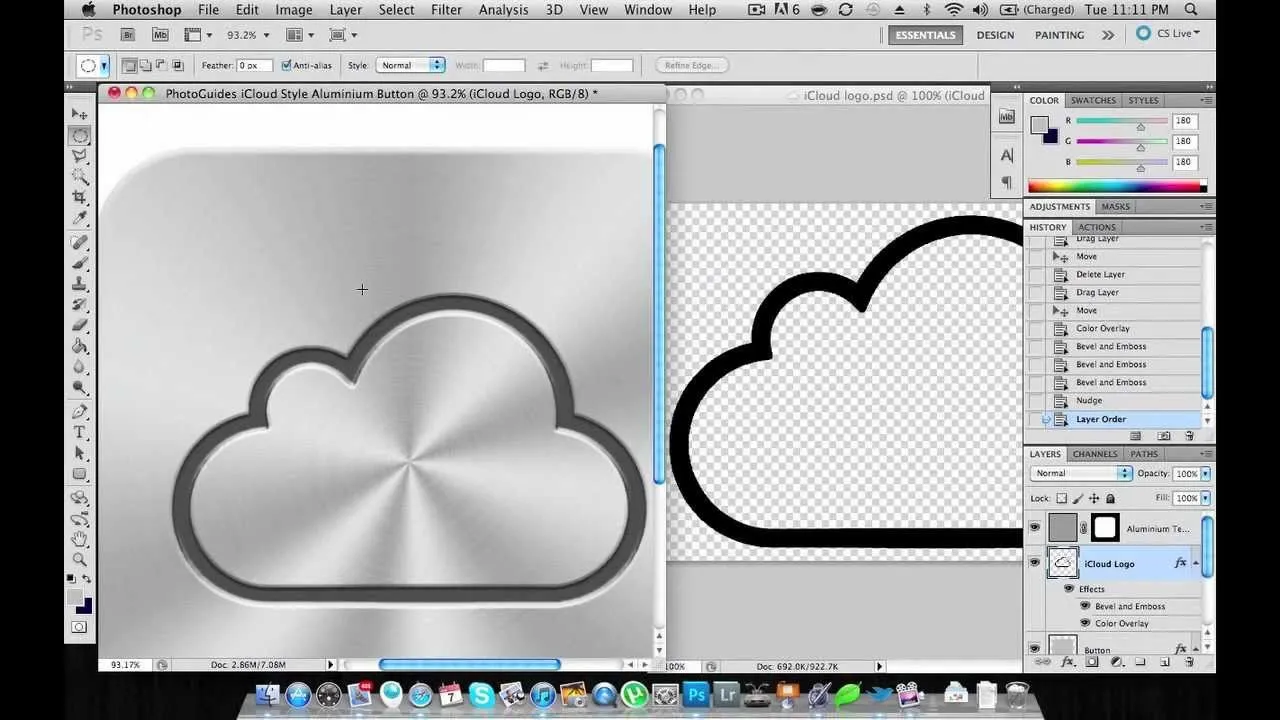
Apple is always coming out with stylish product designs, heck even the logos they use for their products are stylish. If you'd like to learn how to make the iCloud brushed aluminum icon in Photoshop, check out this helpful video.
This video will show you how to use Adobe Photoshop to create a very realistic looking light ray using a Mask, Radial Blur and adjustment layers. Give your images a beautiful sun-kissed appearance with the techniques demonstrated in this how-to video.
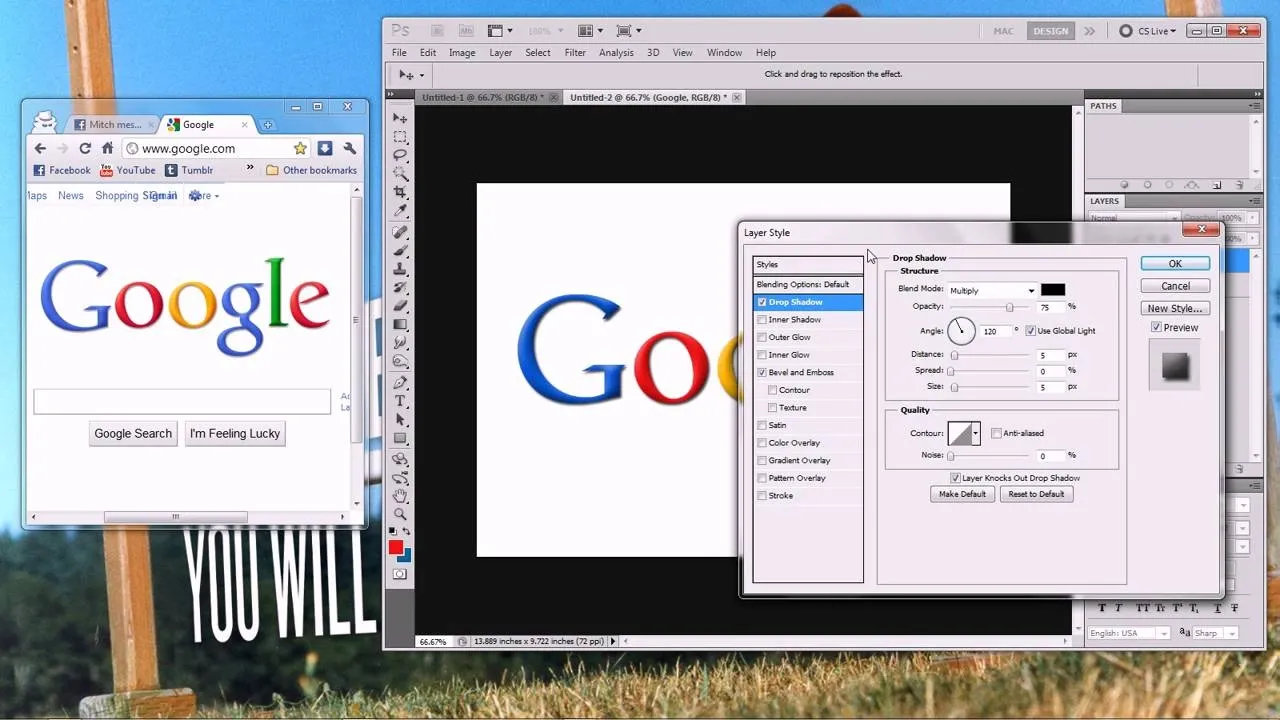
This helpful video will teach you how to recreate the iconic Google logo in Adobe Photoshop. If you've got a great idea for a fun Google doodle, or you just want to work on your Photoshop skills, check out this video to learn how to make the Google logo in Photoshop.
This Adobe Photoshop video tutorial shows you how to create a peeled sticker effect. We'll start with a few concentric circles to form the main shape and then apply a texture for interest. Lastly, we'll add a peel and 3D effect.
Bring out the details in your photos with one simple photoshop filter. Using the high pass filter will increase the sharpness of your photos, and allows you to focus on the specific areas that you would like to see in greater detail.
Bring your Adobe Photoshop images to life with this wonderful effect, the page curl. Create a sense of movement and tell a story by adding the page curl, also known as page peel, effect. This is a simple procedure that you can master once you've watched this video.
Learn how to create a stylish inset logo. The techniques demonstrated in this video can be used on any logo quickly and easily in photoshop. You can do something new with your designs by learning what this video shows you how to do.
NASA just released this beautiful image of what's leftover from a supernova explosion. The red cloud is expanding cosmic debris, the blue is a blast wave of electrons, and the stripes at the edge tell of a high energy burst of x-rays that may be bound for earth. This image was enhanced—Photoshopped—so that scientists can have an easier time interpreting the picture and so that the public can have an easier time appreciating the beauty of nature.
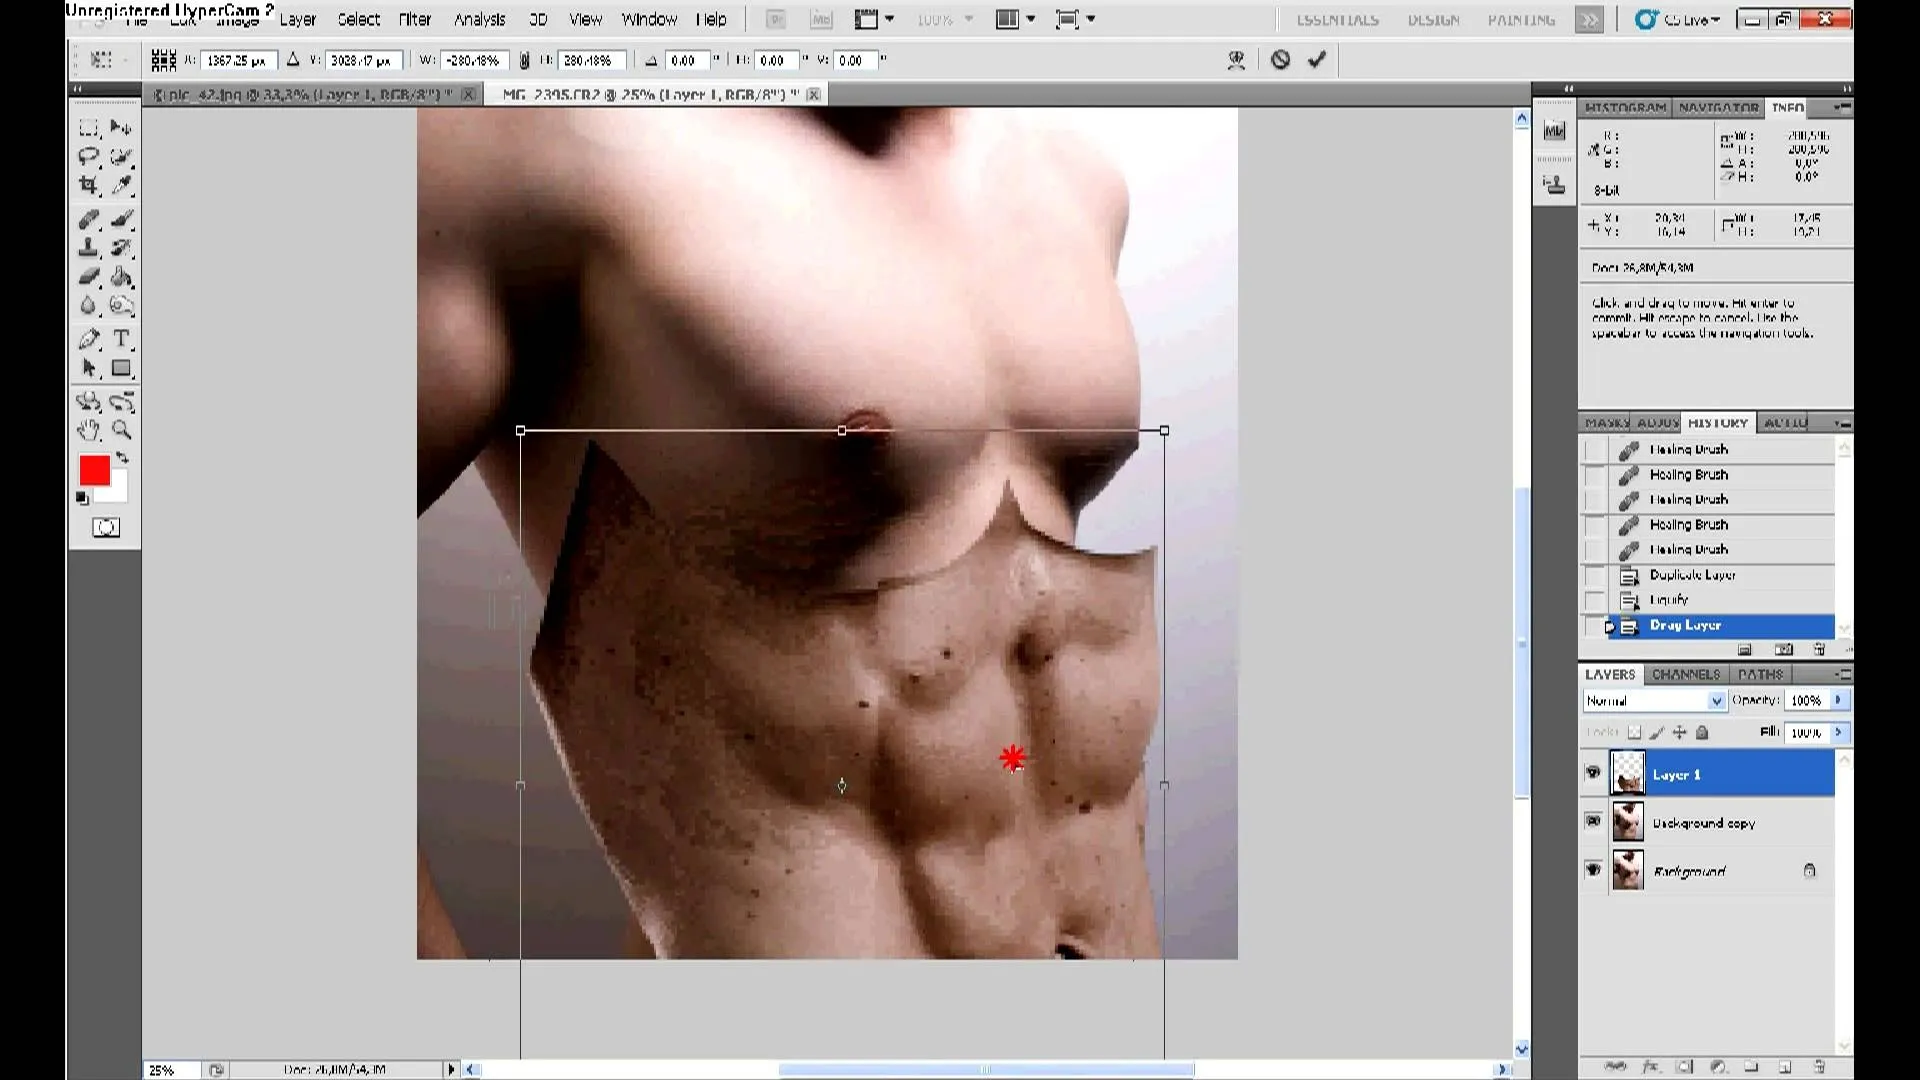
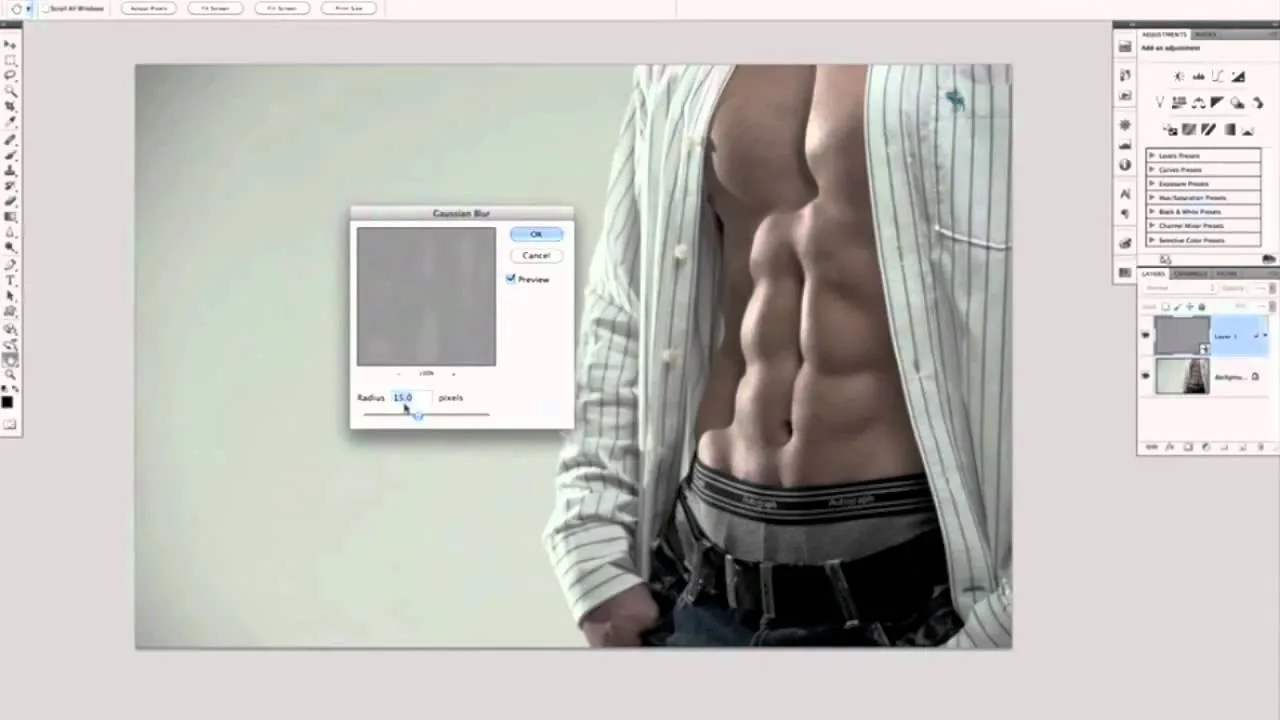
I want to pump. You up. OK, even better, why not pump yourself up. No, not through hard work and dilligence, what fun would that be!? No, do it the simple way, by firing up your Photoshop and touching up the photo. What you'll do in this process is "grab" the abs from someone who actually DID work out, and you'll 'borrow' them for your photo. Then, you'll simply graph them onto your own pathetic frame. Voila! Body builder.
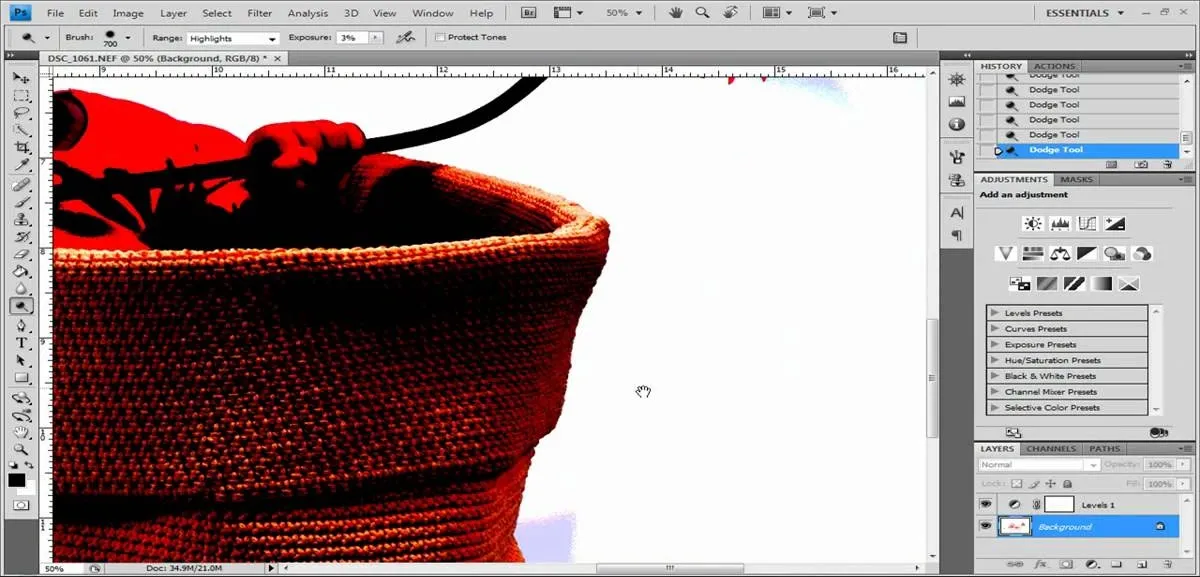
Who has time to go to the gym any more? Not to mention the money. And then there's all that heavy lifting if you do get there. Why not just fire up Photoshop and turn that 96 lb weakling into a gym monkey beefcake? This Photoshop editing technique for giving a similar look dodging and burning only a lot quicker. This is a technique was developed by Photoshop Guru Calvin Hollywood. This tutorial will show you how it's done. In no time at all you'll be faking out people with your touched up...
This how to will teach you how to single out one color with Adobe's Photoshop CS5. This technique will work with other versions of PS as well. With this trick, you'll be able to create some fantastic effects, make colors pop, or simply highlight something you want to show off. It's not hard to do, and a useful things to know if you're planning on putting your Photoshop skills to use in a professional manner. Now you can remove all but one color in Photoshop.
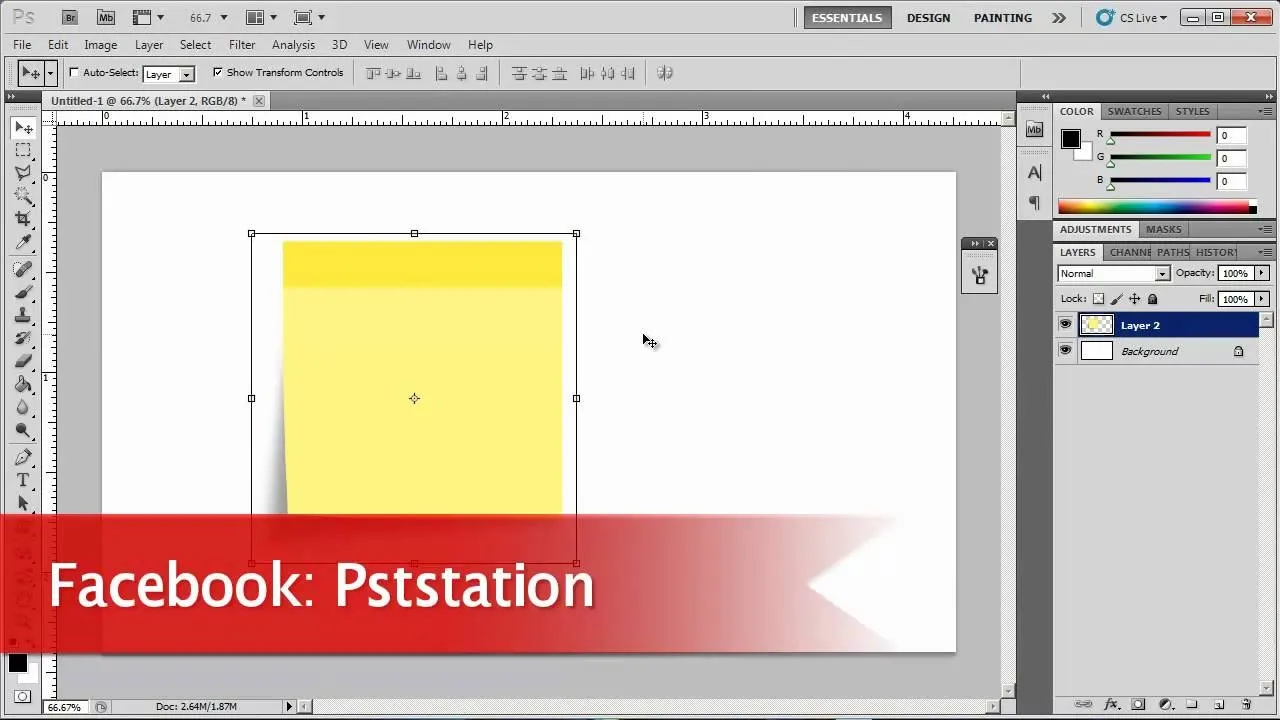
Now, instead of leaving Post-It notes on a monitor screen, you can create virtual Post-It notes in Adobe Photoshop! This is a quick tutorial for the intermediate to advanced user of Photoshop, showing you how to create a square, yellow graphic that looks strikingly like the Post-It notes you can find at office supply stores! Add to your website, incorporate in PowerPoint presentations, or use wherever you see a need for a virtual sticky note!
Photoshop remains one of the coolest digital editing tools of all time, and if you're a user, you're likely discovering new tricks every day. One of the most helpful tricks is removing a shadow from an object, such as a face, a car, a cat, a dog or like this tutorial, a child. This excellent tutorial walks you through each and every step to show you how to use Adobe Photoshop to make those shadows vanish. Check it out and clean up your photos today!
A box mosaic is an interesting technique you can use to add interest to your project in Adobe Photoshop. This tutorial shows you how to set up a brush effect and then use that brush effect to create the patterned box mosaic look for your next project.
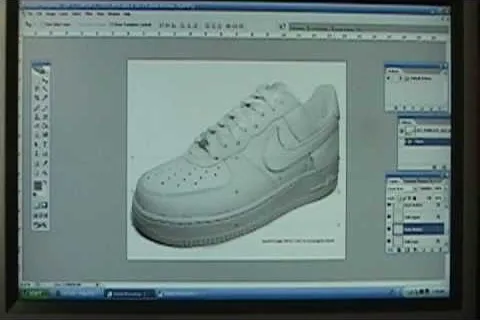
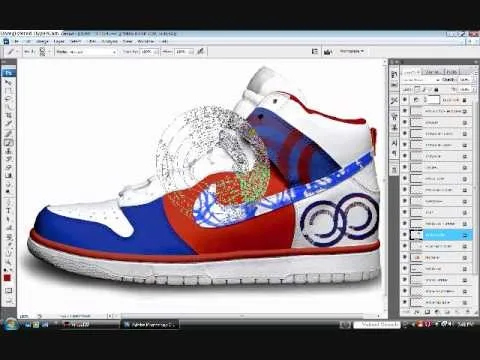
Custom leather sneakers like Dunks and Air Force Ones are becoming popular canvases for painters lately, who transform the white slab-sides of the kicks into awesome artworks. This video will show you how to design a custom shoe in Photoshop, working out the kinks before you put paint to shoe and wind up ruining a $120 dollars pair because you painted something you didn't want on it.
Basketball shoes are expensive, so if you want to use something like Dunks (a big, beautiful white leather canvas) for a custom painted sneaker project you better know what you want to do before you start. Enter Photoshop. This video will teach you how to use Photoshop to plan your kick design out before you paint, helping ensure that you kicks come out the way you want.
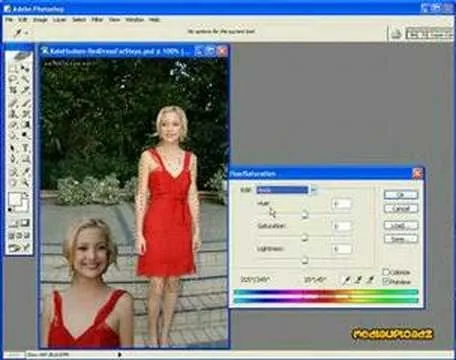
Adobe Photoshop is an amazing digital photo editing tool that let's you do a myriad of tasks. In this tutorial you will learn how to change the color of fabric, like a dress, from the existing color to whatever you wish it to be. You'll be using the magic lasso and playing with the color balance sliders to make it happen. The video is quick, but should be all you need to get your job done. So go for it and make that red green now!
If you're using Adobe Photoshop, you may come across a situation where you or a client wishes to change the color of an item of clothing, say a dress, or shorts, or a shirt, or socks, or shoes, or a hat, or gloves - virtually anything - this tutorial can show you how to make it happen. This quick how to is easy to follow and just what you'll need!
If you're a fashion designer using Adobe's Photoshop CS5, you already know you can do a host of amazing things. One of the things you'll likely wan to do over and over again is check out your creations in different colors. This quick how to demonstrates what you need to do to go from red to yellow, green to blue, mauve to black and back again. Check it out!
If you're using Adobe's Photoshop CS5 and want to change the color of someone's dress in a photo, this tutorial will show you how to do it. This how to is detailed, and shows a step by step guide for going from red to green, blue to yellow, basically any change you want to make! Photoshop is a powerful photo editing tool and with this trick you can choose the color of people's clothing instead of being stuck with what they were actually wearing.
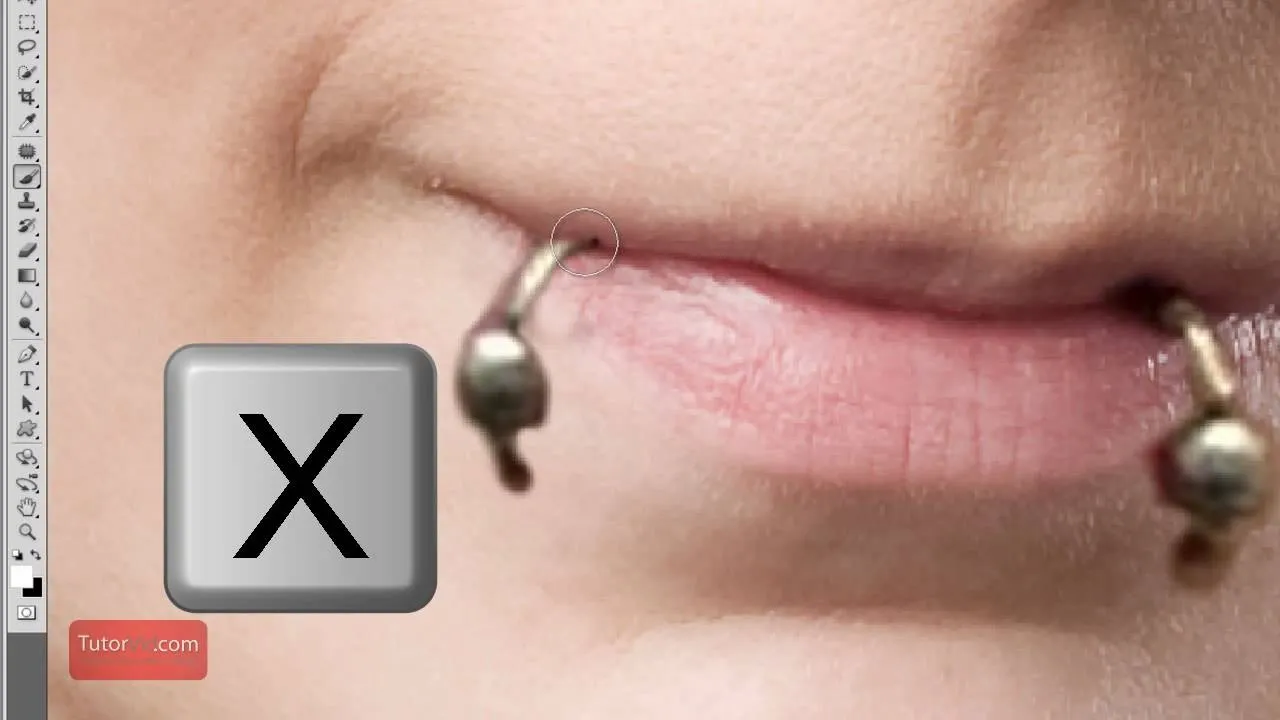
If you're thinking about getting a piercing, but aren't sure how it will make you look, you can use a program like Photoshop or GIMP to edit in a fake piercing. Start with a photo of yourself, with the area you are considering piercing shown prominently. Then find a picture of someone with the same kind of piercing that you want, and then use some of the editing tools and tricks in photoshops to see how it will look on you!
Want to prank a friend by making them look like a punk? Or get revenge by showing the picture to their parents? Or maybe you just want to see what you would look like wiht an eyebrow piercing yourself. Start with a photo of your subject, one with the eyebrow prominently shown, and then follow the steps in this tutorial to add a fake eyebrow piercing using the tools and techniques in Adobe Photoshop.
GIMP is the free alternative to Photoshop, and many of the things that you can do in Photoshop, you can also do in this open source software. Want to see how you'd look with a lip piercing, or want to touch up a photo and add one where there isn't? This tutorial shows you how to add a fake lip piercing to nearly any photo. It's not that difficult - as long as you're familiar with the basics of GIMP, you'll be able to make this work for you!
With vintage-inspired, indie Etsy pictures being all the rage, isn't it about time you jumped on board the retro picture wagon? Whether you desire making that vignette of schoolbooks from the 1920's topped with mini celluloid deer look more aged and sophisticated or you simply want to endow your portraits with a more old timey feel, fading the edges of a picture is your easiest and quickest way to achieve instant vintage.
If only we could fade bad memories of bad exes as easily as we could fade photos. But we digress. If you have a special photo memory you'd like to visually enhance and preserve for posterity, then one of the best tricks you can do is to fade the photo edges using Photoshop.
We don't know why exactly, but somehow fading the edges of a photograph makes it look more sentimental. Maybe it's because faded edges remind us of old timey photographs that have yellowed and softened with age, or maybe it's because faded eges endow a sort of dream-like atmosphere to your picture.
Have you taken a photo that's perfect in just about every sense other than one? Like, for instance, that picture of you and your newly minted husband dancing at your wedding reception with your husband's drunken brother getting freaky with one of the waitresses on the side?
Bras are such wonderful inventions. Without them, our twins would stray and wander right out of our clothing, and cold weather would prove rather uncomfortable - not to mention awkward - anytime we take our sweater off (if you catch our drift).