

Photoshop How-Tos


How To: Create fog in your photos using Photoshop CS4
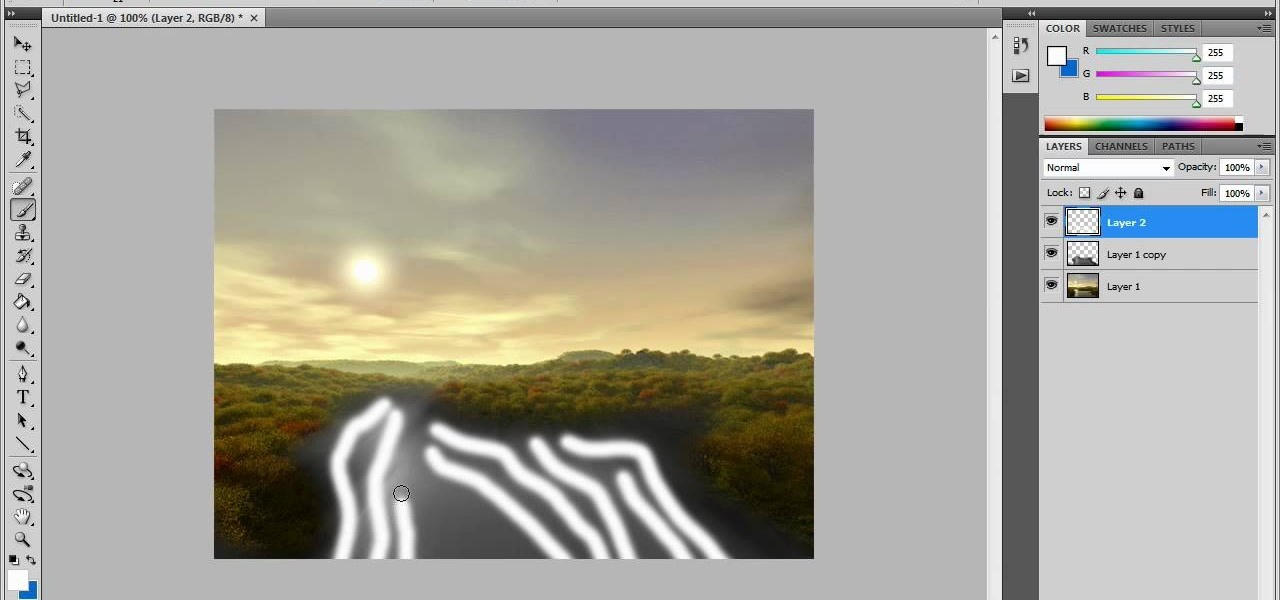
In this video tutorial, viewers learn how to create fog using Adobe Photoshop. Begin by importing the image into the program and duplicate the image. Now go to Filter, select Blur and select Radial Blur. Set the amount to 100, Blur Method to Zoom and Quality to Best. Now select the rectangular marking tool and select the sky. Then open the Hue/Saturation menu and set the Saturation to -100. Use the eraser tool to remove the gray from the edges. Now use the paint tool and paint white streaks o...

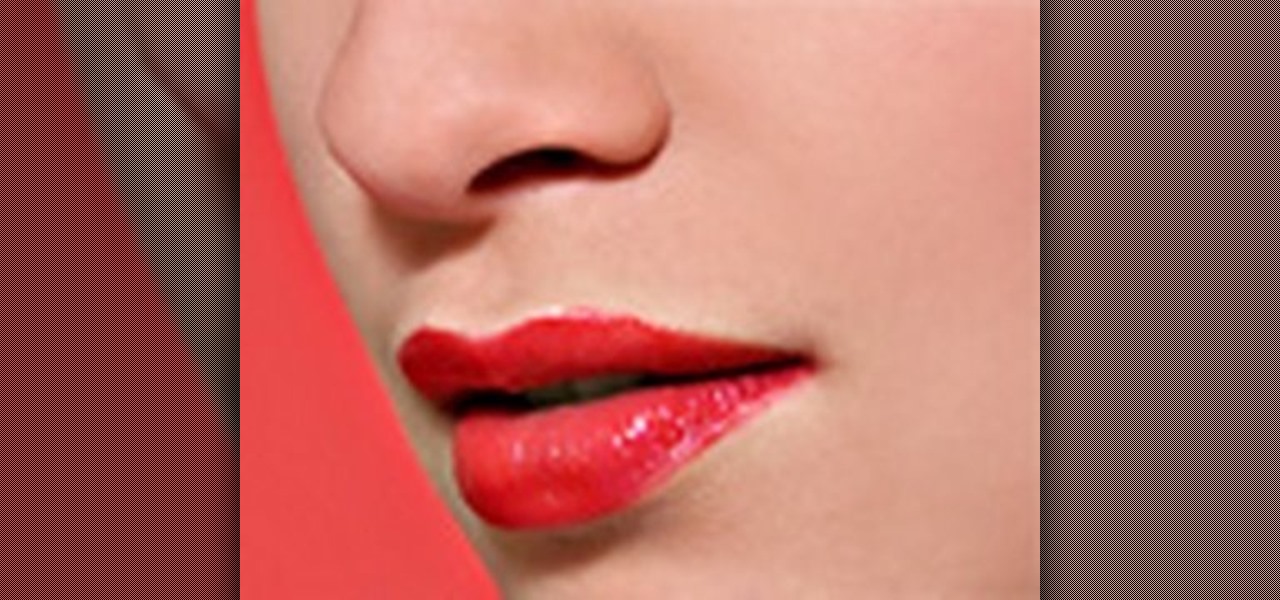
How To: Change the color of your lips in Photoshop
In this video tutorial, viewers learn how to change the color of lips in Adobe Photoshop. Begin by importing the image into the program. Select the quick mask tool and then select the brush tool. Now color the part that you want to retouch. This will allow the mask to create a selection. No click on the masking tool to create a selection. Then select the marquee tool. Right-click the selection and click on Select Inverse. Right-click the selection again and select Feather. Make it 1 pixel and...
How To: Eliminate facial imperfections using Photoshop
In this video tutorial, viewers learn how to eliminate facial imperfections using Adobe Photoshop. Begin by opening the image in the program. Then select the patch tool. Now draw a circle around the imperfection and then move it to an area of the skin that has no blemished. Continue doing this for all the imperfections. This process can be done to eliminate pimples, moles, blemishes, scars and wrinkles. This video will benefit those viewers who enjoy editing images to enhance them and would l...

How To: Fake a depth of field using Photoshop
If you want to learn how to add a fake depth of field in Photoshop this is for you. First start off with a picture that has clarity throughout the picture. The first thing to do is add another layer. To do this you must grab your first layer and drag it to the bottom right where it says new layer. You will now have two layers to choose from. The next step is to blur the top layer of the photo. To do this select the top layer go to filter at the top of your window and scroll down to blur. Sele...

How To: Create glowing eyes in the darkness with Photoshop CS4
In this how to video, you will learn how create glowing eyes in the darkness using Photoshop. First, open your image in Photoshop. Next, duplicate the background layer. Go to hue and saturation and make the image really dark by turning down the lightness and saturation. Next, select a paintbrush for the eraser and start erasing around the eyes. Once this is done, make a selection around the pupils. Create a new layer and paint the selection red. Next, lower the flow of the paint brush and cho...
How To: Make your own Adobe CS4 logo in Photoshop
In this Software video tutorial you will learn how to make your own Adobe CS4 logo in Photoshop. Open Photoshop and click ctrl+O to open a new document. Set the height and width to 500 pixels, select ‘transparent’ under background contents and click OK. Create a new layer and with the rectangle tool draw a rectangle. Right click on the shape layer > rasterize layer. Hold ctrl and click on the thumbnail of shape1 layer. Open gradient tool and make a light to dark gradient as shown in the v...

How To: Create shock style text in Photoshop
In this Software video tutorial you will learn how to create shock style text in Photoshop. Go to the text tool and select it. Then select the font and a large size. Select white color and type in your text. Now create two copies of this text and select the original text. Then click on image > rotate canvas > 90 degrees clockwise. The text will turn by 90 degrees. Now go to filter > stylize > wind. Make sure under ‘method’, ‘wind’ is selected and under ‘direction’, select ‘from ...

How To: Make chrome paint on black cars using Photoshop
The first step is to select a photo of a black, glossy car. Using the Lasso- polygonal tool, select the outline of the car. Once the image outline is complete, the dots animate around the image. The next step is to deselect the areas on the car where the chrome paint is not required. To do this, follow the same procedure as above holding the ‘Alt’ key (a minus sign appears next to the cursor). Once the selections are done, go to ‘Image’ menu, select ‘Adjustments’ and click on ‘B...
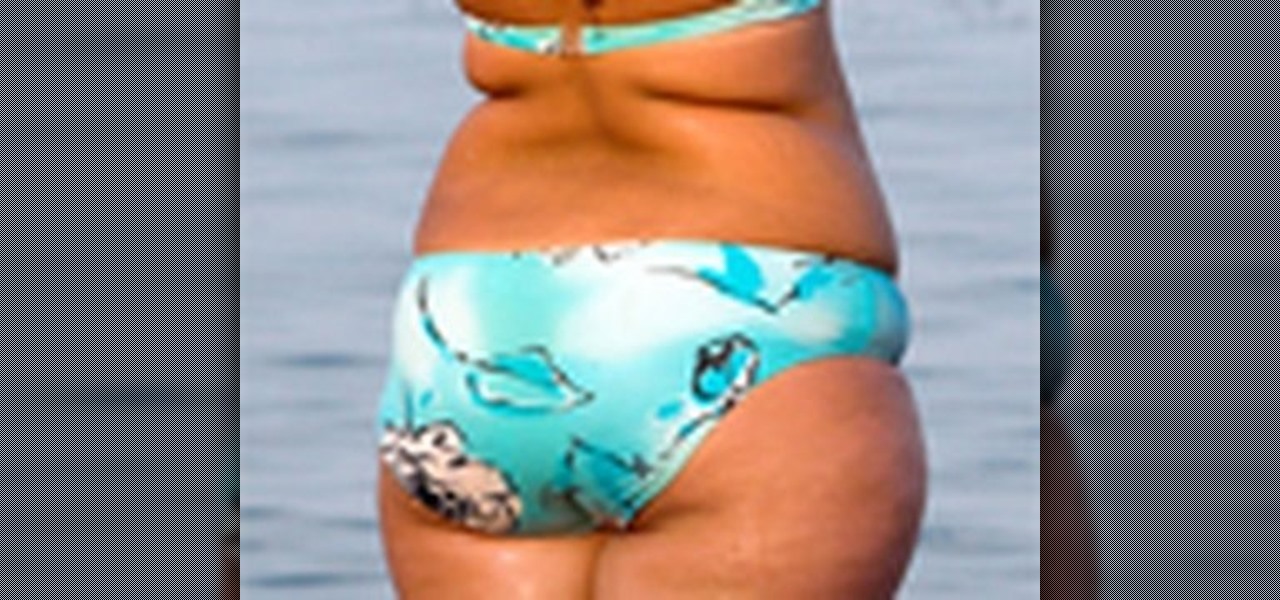
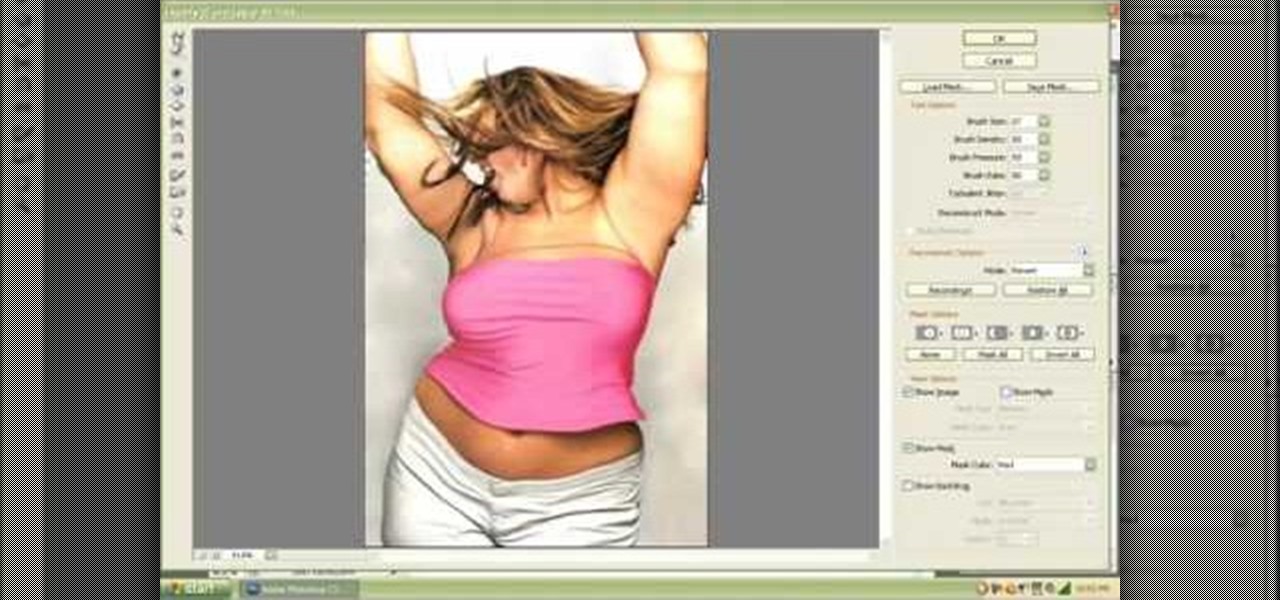
How To: Lose Weight by Using Photoshop
This video shows the method to do weight loss using Photoshop. Open the image and go to 'Filters' and 'Liquify'. Click on the 'Forward Warp Tool' on the left. Zoom into the back area and drag the mouse in towards the body to make it thin. Keep the 'Brush Pressure' high to get a sharp result. 'Brush Size' determines how large the brush is and the area affected by it. Use the 'Pucker Tool' and click on the ass to reduce it. Reduce the sides of the ass with the 'Forward Warp Tool' and reduce the...
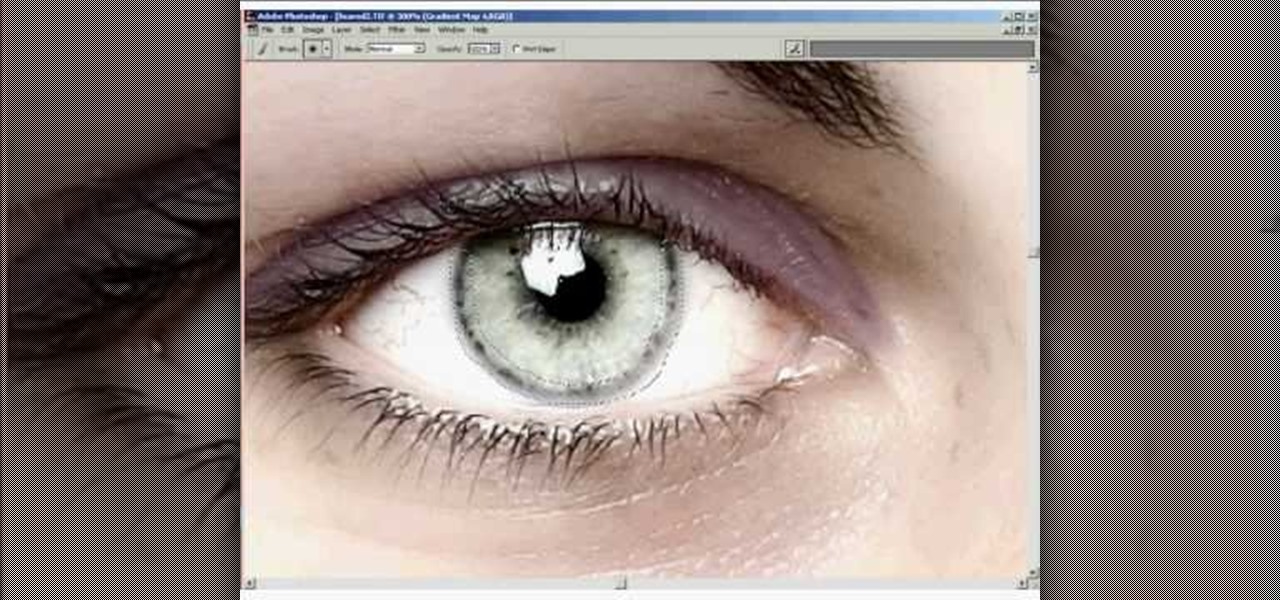
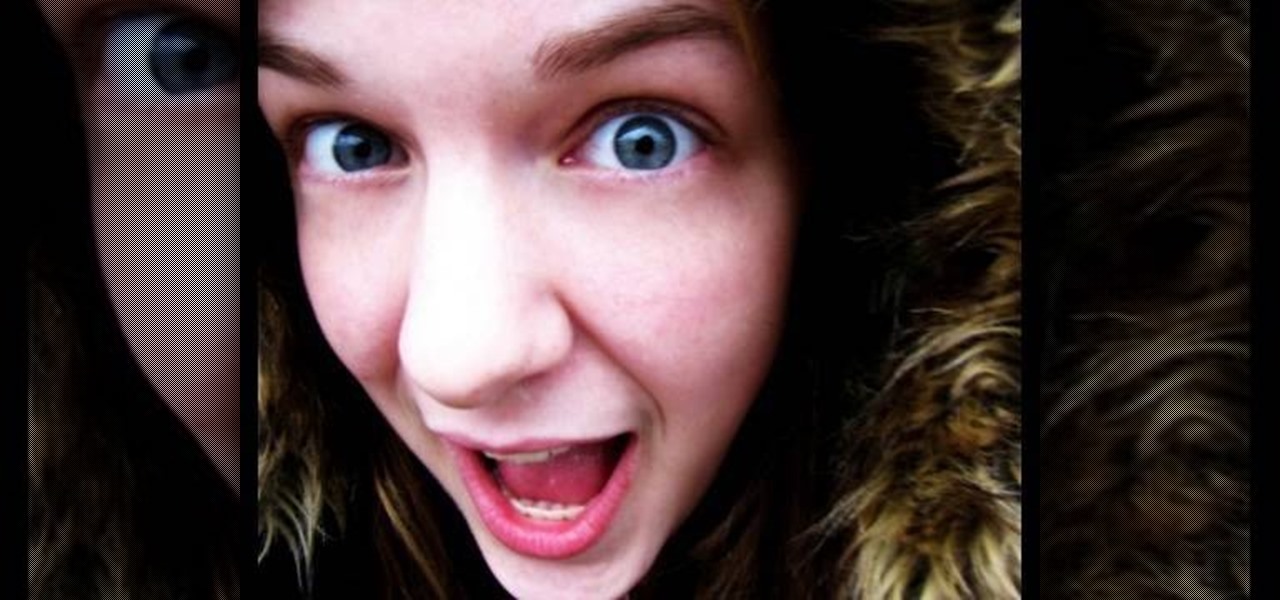
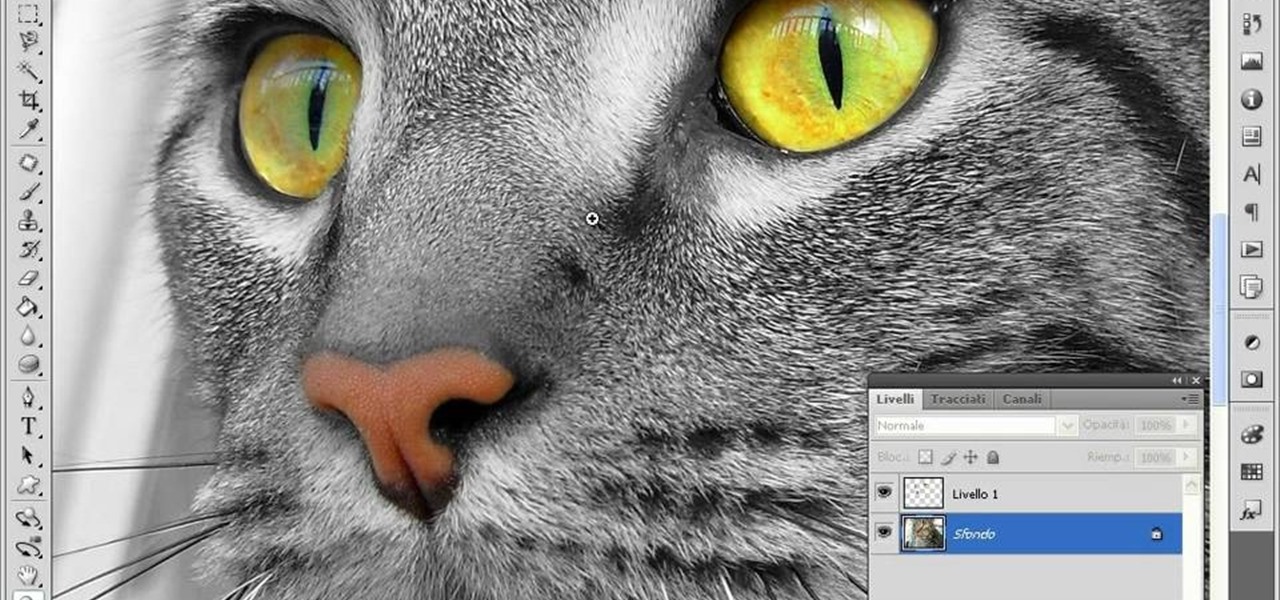
How To: Retouch or add digital makeup using Photoshop
If you want to retouch or add digital make up using Photoshop you should first erase and cover up any blemishes you see on the surface of the skin. This can be bruises, blemishes, or even acne marks and bumps. Do this anywhere you feel necessary such as the face or on the body. Using the lighten tool, you can also lighten the eye color as well as the whites of the eyes. Next, you can also adjust the texture and color of the lips. You can also shift the color saturation of the picture to add r...

How To: Convert photos to black and white in Adobe Photoshop
Open the picture you want to edit. Right-click on the main picture layer in the box and then select "Duplicate Layer". Then, in the same box, go to the drop-down menu that says normal, and change it to "Overlay". Then, select Filter>Other>High Pass. In the box that comes up, set the radius to 7.4 pixels. Next, go to Layer>New Adjustment Layer>Gradient Map. Then, when the box comes up, click OK. Then click on the main gradient in the Gradient Map. In the new box, there is a bar that goes from ...
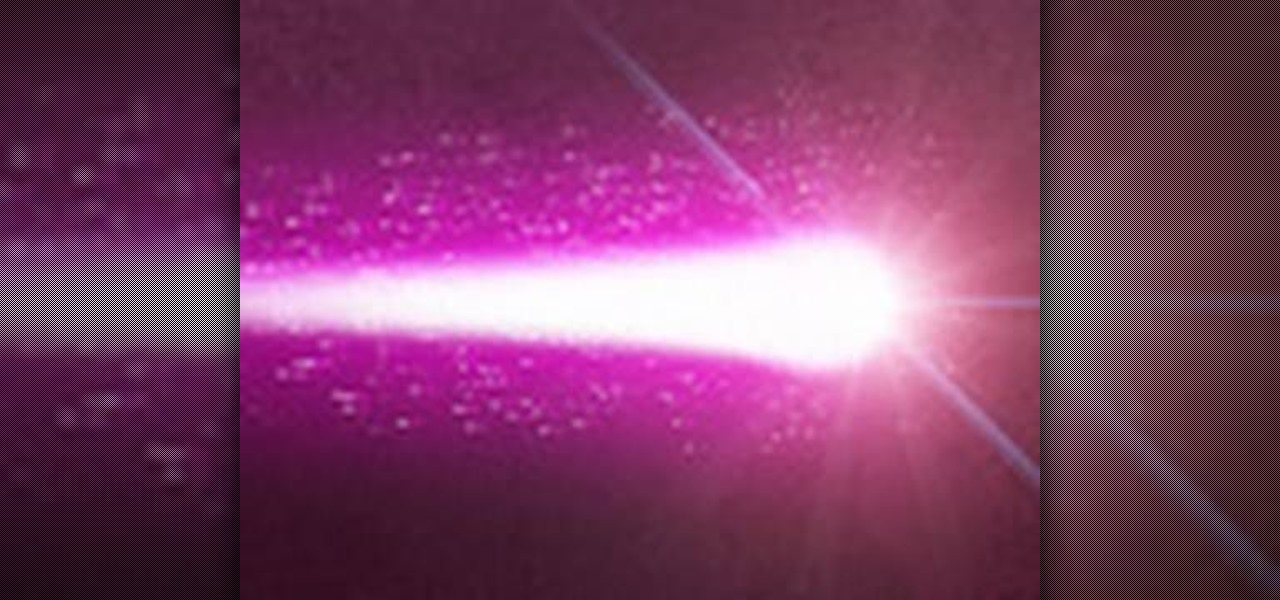
How To: Create a comet/shooting star sing Photoshop CS4
There aren't any words in the silent instructional tutorial video, but if you watch carefully, you'll learn the exact steps necessary to create a phenomenal looking shooting star or comment with nice looking special effects that are achievable in Photoshop. First you'll select a circular region with the selection tool, then you fill it with white. Next you'll use brush settings to create a brush stroke that straight and fades over time to create the comet's tail. Then you'll use Photoshop's l...

How To: Get white teeth using Photoshop
In this video, we learn how to get white teeth using PhotoShop. Before you begin, open up PhotoShop and open the picture you want to change. Make sure you zoom in on the teeth so you have a good view and it's easier to paint. First, select the dodge tool, the choose midtones. Now, select the brush that is "round-soft" and brush the brush over the teeth that you want whitened. If you make any mistakes, you can use the eraser tool to clean up what you changed. Once you are done, save your photo...
How To: Sharpen blurry images using Photoshop
In this Software video tutorial you will learn how to sharpen blurry images using Photoshop. Open the image and duplicate the original layer. Then go to filter > other > high pass. In the window that pops up, enter a value of 4 – 6 pixels. Now simply change the blending mode of that layer to overlay by clicking on ‘layers’ and selecting ‘overlay’ from the dropdown menu. You will notice that you have a much clearer picture. Then go to filters > sharpen > ‘unsharp mask’ to add som...
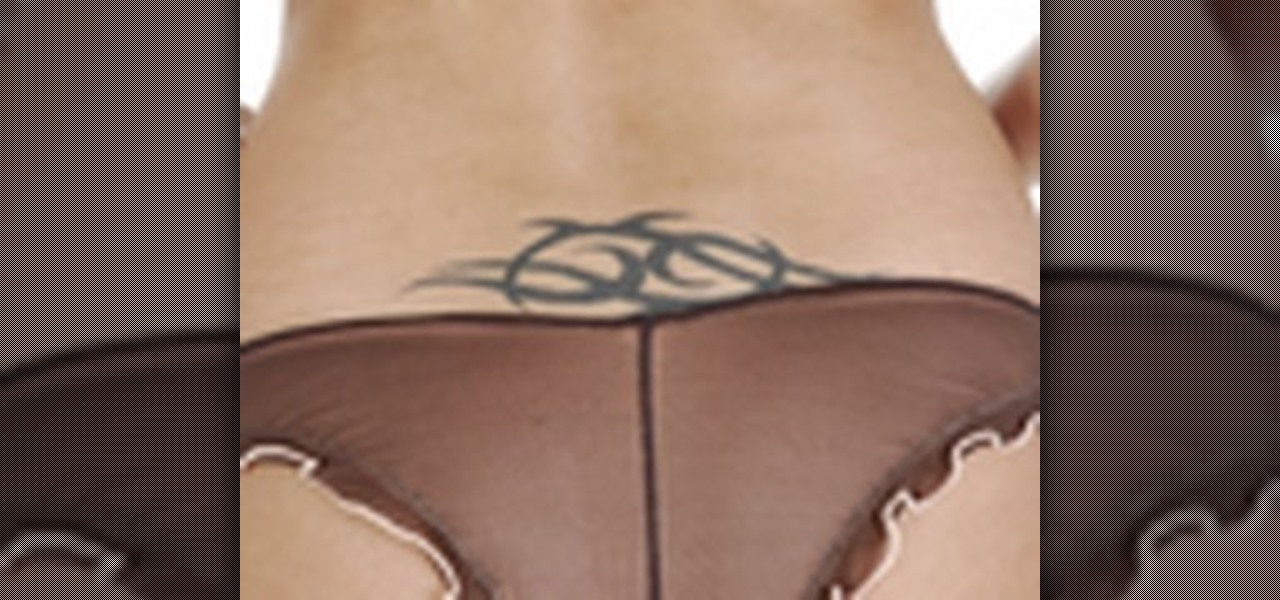
How To: Easily remove a tattoo using Photoshop
This video shows you how to remove a tattoo from a photograph using Photoshop. First, select the tattoo using the pen tool, to get a very accurate line around the tattoo. Make sure the "Paths" button is punched in. Drag the mouse and click several times to make a path around the tattoo. Right click on the path and choose "make selection". Feather the selection with a feather radius of about 8 pixels. Use the clone stamp tool and a large size brush. Hover outside the selection and click to sam...
How To: Transform any photo into a sketch using Photoshop
In this video, we learn how to sketch a photo in PhotoShop. First, open up PhotoShop and open up the picture you want to convert. Then, click "image", "adjustments" and "desaturate". You will now copy this layer by dragging it down to the "new layer" button. Now click on your copied layer and go to "image", "adjustments" then "invert". Now click the "blend" option which will change your layer to completely white. Now, click "filter" then "other" then "minimum". You will now see your image sho...

How To: Add Fireworks to Any Night Picture in Photoshop
Going to miss the fireworks extravaganza this Fourth of July? Doesn't mean you can't fake the experience, and that's exactly what we're going to do here—in Photoshop. You're going to learn how to take any night photograph and insert fireworks into it. It's the next best thing to watching some fireworks display firsthand.
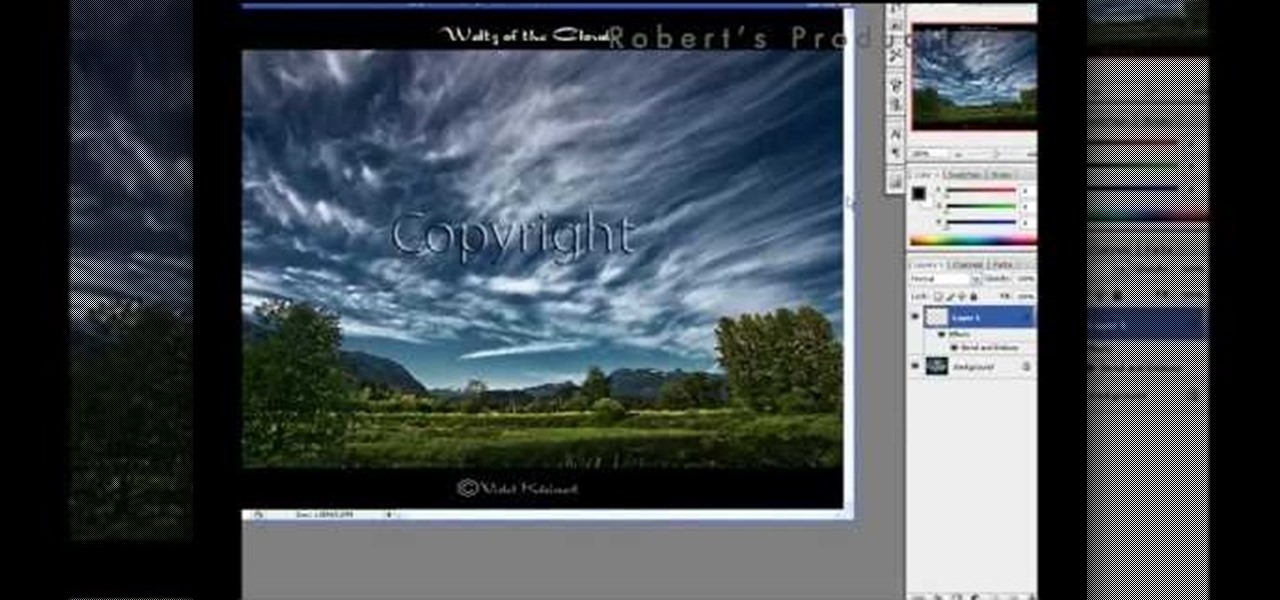
How To: Add a watermark to your images using Photoshop
In this video tutorial, viewers learn how to add a watermark to an image using Adobe Photoshop. Begin by importing the image into the program. Select the Horizontal Type Mask Tool under the Text tool. Then select the font color, type and size. Now type in the text and click out of it when finished. Then press the Control and J key to open the text into a layer. Click on the layer and select the style. Now finish by editing and customizing the text. This video will benefit those viewers who ha...
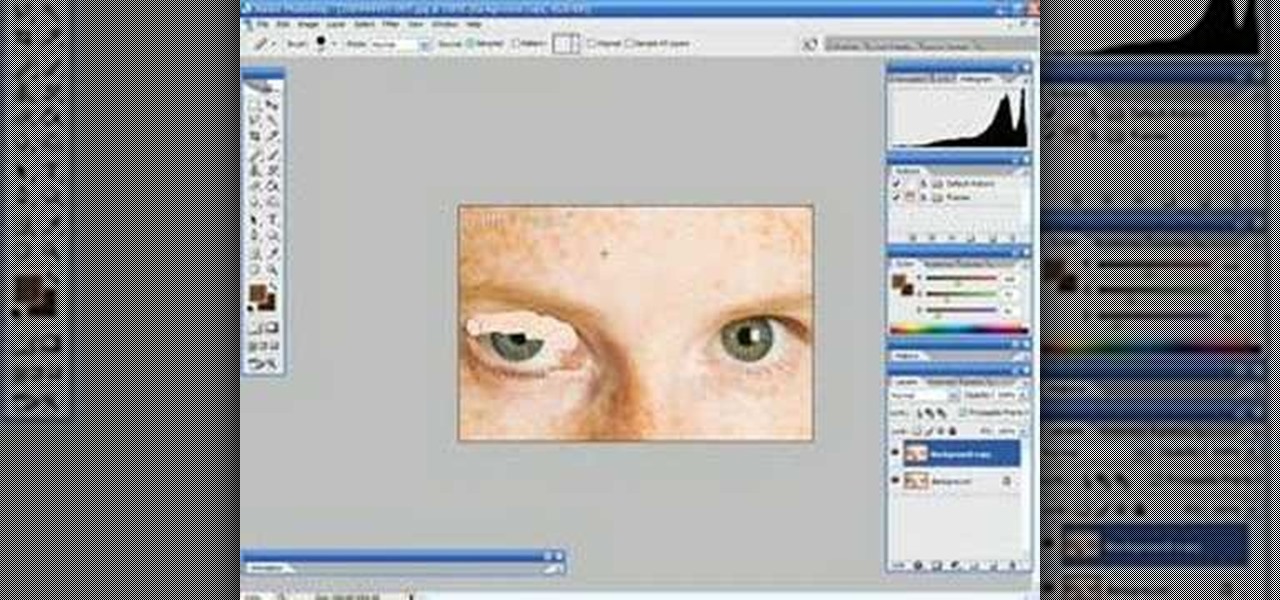
How To: Make a winking animated GIF in Adobe Photoshop
In this Software video tutorial you will learn how to make a winking animated GIF in Adobe Photoshop. Select a photograph of two eyes and duplicate the layer. Now copy the top eyelashes and paste them on top of the bottom eyelashes. Go to the eye drop tool and select a dark color. Then go to paint brush, choose a brush with size 1 and select darken in the ‘mode’ dropdown menu. Reduce opacity to 50%. Now darken the lower eyelashes as shown in the video. Then go to healing brush tool and se...

How To: Make 3D text in Adobe Photoshop CS3/CS4
3D seems to be all the rage right now. You don't want a logo that is behind the times! In this tutorial, learn how to make text look 3D using Adobe Photoshop CS3 or CS4. Your graphics will look much more up to date and really pop out of the page with this cool technique.

How To: Resize an image for print using Adobe Photoshop CS4
In this how to video, you will learn how to re-size an image for printing using Photoshop. First, open the image you want to re-size in the program. Next, go to image and select image size. From here, you will see the current size of the image. You can change the units of the sizing. The resolution is the number of dots printed per inch. De-select re-sample to change the resolution of the image only when printing. 300 is the standard resolution. When you re-size the image, make sure constrain...

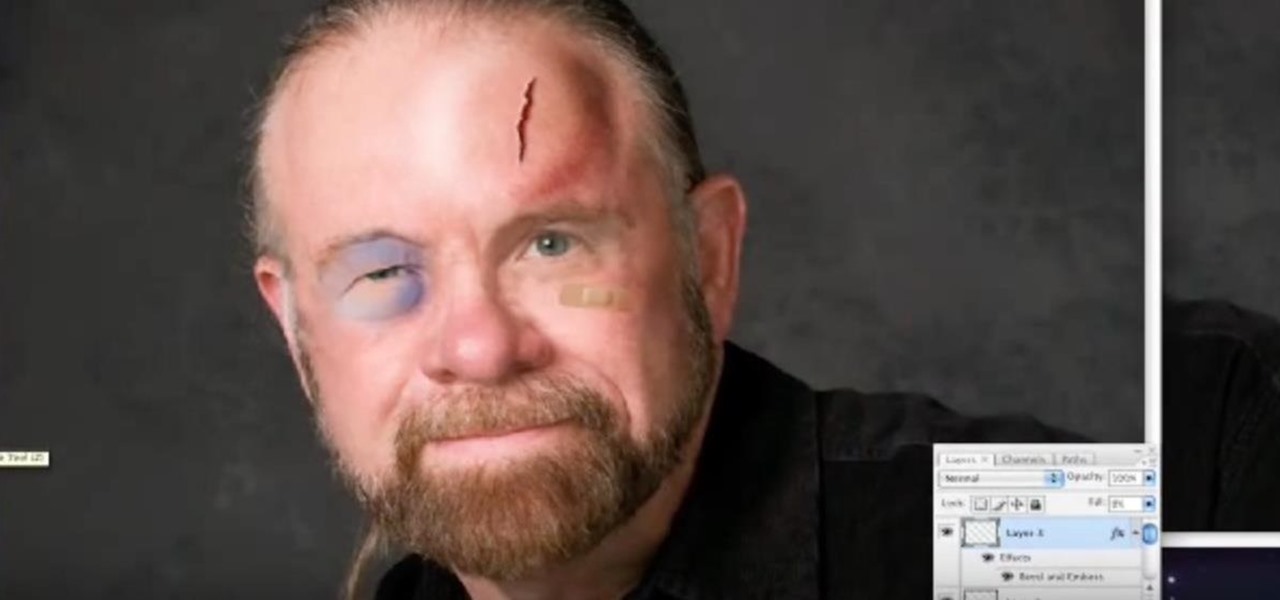
How To: Create a blood spatter from Watchmen
TutCast shows viewers how to create the blood spatter from Watchmen in Photoshop! First go to TutCast.com/watchmen and download the given file that will provide you with the layers needed for this project. First, click layer and click bevel and emboss. First, start with Inner Bevel, Keep it smooth and leave depth at 100. Direction is up and change the size to 8 and soften to 10. Now, set the angle to -70 and altitude to 30. Now, the gloss contour you should pick the fourth option and the high...

How To: Change car rims and increase the size in Photoshop
In this how to video, you will learn how make car rims bigger using Photoshop. First, open the image in the program. Choose the elliptical marquee tool and select the rim. Next, right click the selection and click layer via copy. Now you should have the cut out rim in a new layer. Drag layer 1 bigger by holding shift. Replace it and then click on the accept button. Erase the part of the rim that is on the body of the car with the eraser tool. Have layer 1 selected and merge it down. Do the sa...

How To: Create an animated loading screen style gif
In this how to video, you will learn how create an animated loading gif in Photoshop. First, open the design you want to use for the animation in Photoshop. It should be similar to the design shown. Go to window and click animation to view the animation panel. First, change the frame time to your liking. Now, set all the shapes to 50 percent opacity except for one. Press the new frame button, duplicating the frame. Drop the opacity of the area of the image and increase the opacity of the area...
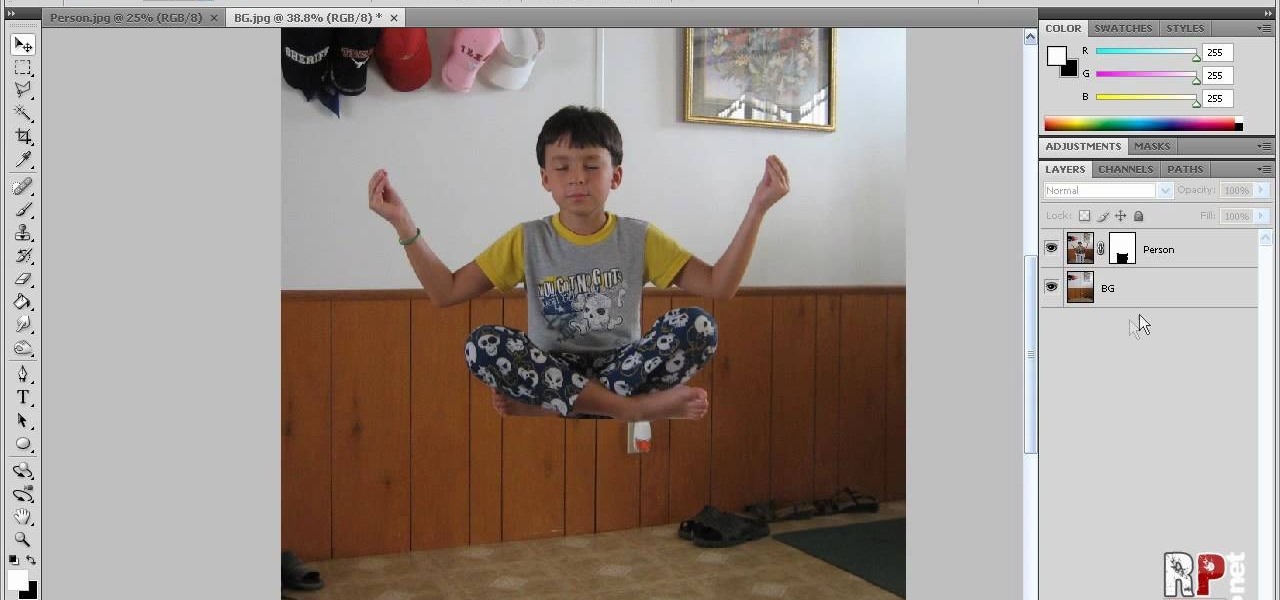
How To: Perform a simple levitation trick using Photoshop
This video tells us the method to perform a simple levitation trick using Photoshop. Take the photo of the background and the person sitting on some object posing as if he or she is levitating. Select the 'Move Tool' and hold the 'Shift' key down. Drag the picture on to the background and release the shift key. Select the layer containing the person and go to the mask tool. Select the foreground color to black. Go to brush tool and set the 'Master Diameter' to 70 pixels and the 'Hardness' to ...
How To: Make a broken mirror effect using Photoshop
This video demonstrates how to make a broken mirror effect using Photoshop.

How To: Add a tattoo to an image using Photoshop
In this how to video, you will learn how to add tattoos to a body part using Adobe Photoshop. First, open both of the images in Photoshop. Next, copy and paste the tattoo image into the body image. From here, lower the opacity of the tattoo so that the white becomes invisible. Increase the opacity of the black area of the tattoo. Next, place the tattoo to where you want it to appear on the body. Once this is done, take the eraser tool and erase the areas where the tattoo is not overlapping th...
How To: Remove blemishes and make other touch ups in Photoshop
This how to video will show you how to remove blemishes and do other touch ups in Photoshop. First, open the image you want to touch up in the program. Now, choose the polygon tool and select the background of the image. Now, go to adjustments and change the brightness and contrast. You can also add a blur in the filters. Use the smudge tool to touch up any errors from using the blur filter. To fix blemishes, use the patch tool. Select the area you want to fix and drag it to an area of simila...
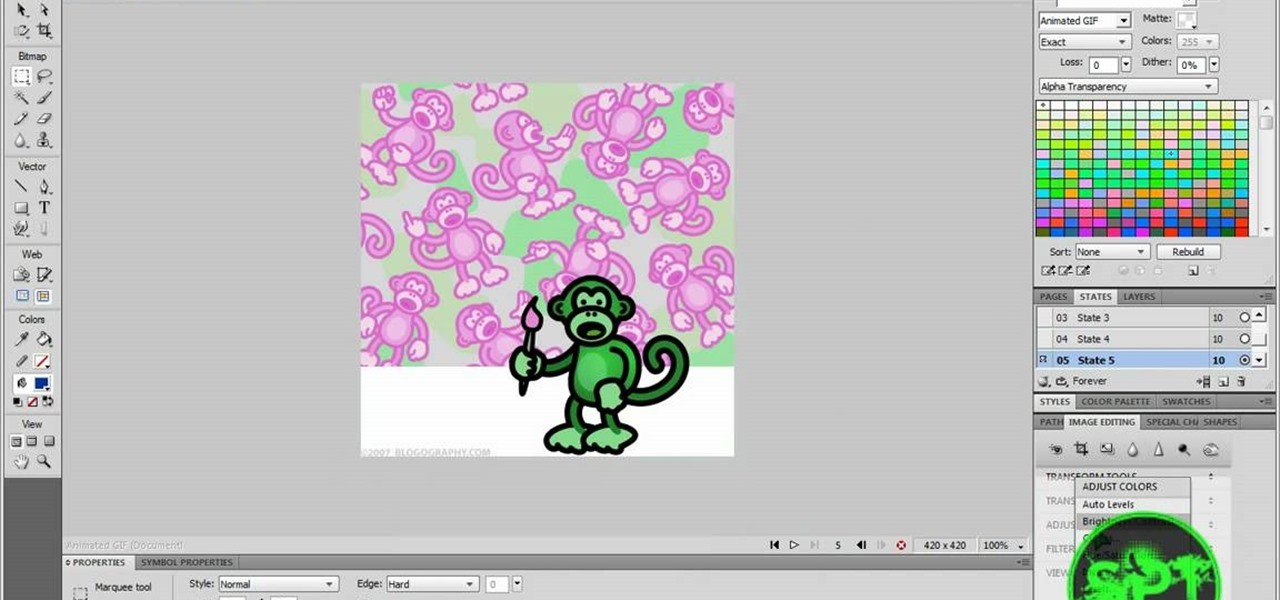
How To: Make animated gifs with Adobe Fireworks CS4/CS3
In this Software video tutorial you will learn how to make animated GIFs with Adobe Fireworks CS4/CS3. It is easier than Photoshop and Flash. You can create a picture or you can drag and drop a picture. To drag and drop a picture, find out the dimensions of the picture. In the example, it is 420 x 420. Now open fireworks, open a new document and set the height and width to 420 pixels and click OK. Now drag the picture and drop it in to the blank canvas. On the top bar go to window > states. T...
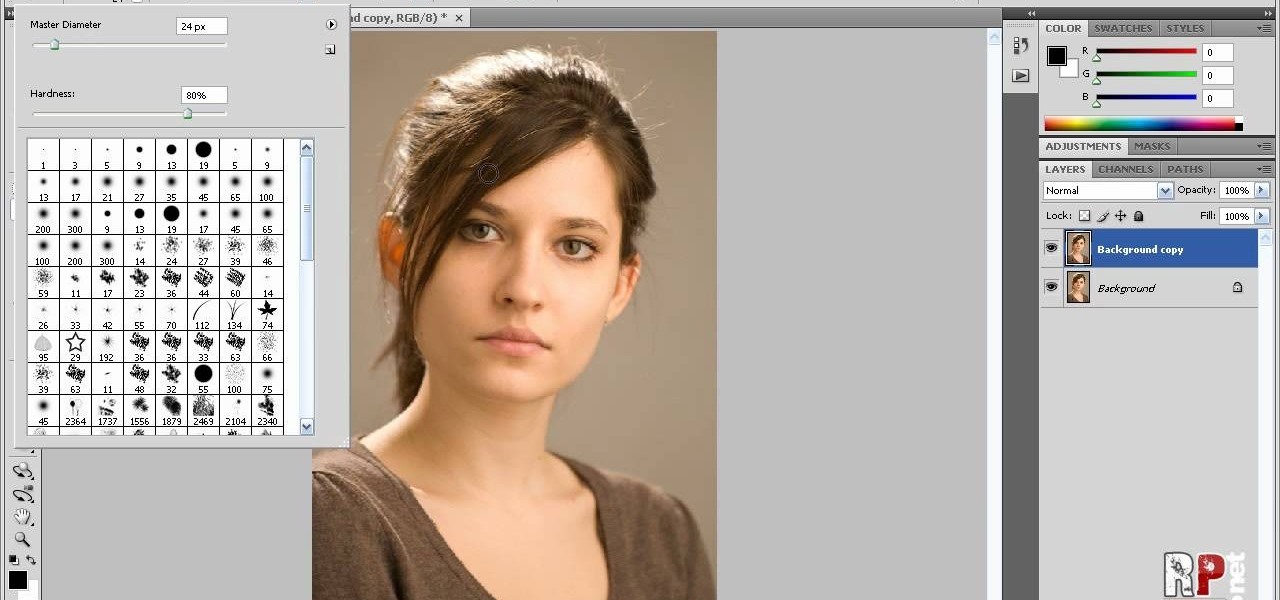
How To: Get a tan using Photoshop CS4
Robert demonstrates how to use Photoshop to give yourself a tan. First, you need to upload your picture(s) into Photoshop. Then pick one to work on. Next, you will need to copy the background to save the original image. On the right side drag the background label to the new layer icon (you can just hit control J). You will then need to select a paintbrush tool. Go up to the tool bar and click on the paintbrush settings to set the hardness at 80%. The master diameter will be adjusted as you wo...

How To: Make simple GIF animations in Photoshop Elements 6
This video shows us the method to make simple GIF animations in Photoshop Elements 6. First we have to make a file with different layers. Click on the icon below the 'Layer' option to make a new layer in the file. After finishing the file, go to 'File' and the 'Save for Web' option in it. On the right side of the window, select 'GIF' as the file type. Check the 'Animation' option. Check 'Loop' to play the file again and again. Click 'OK' and the window to ask you the name of the file will be ...

How To: Create a picture frame in a photo
In this video, we learn how to create a picture frame on a photo using PhotoShop. First, open up the program and open the picture that you want to change. Next, select the rectangular marquee tool from the toolbar on the side. Now, create a selection of what you want to frame. Then, click with the right key and select "inverse". Click again with the right key and choose "layer via copy". Now, click 2 times on the layer to open and the layer style menu will show up. Now put the contour to crea...
How To: Create futuristic wallpaper in Adobe Photoshop CS3
This how to video shows you how to create wallpaper for your computer desktop. Open Photoshop and create a new file. Change the dimensions to the size of your desktop. Click okay and go to edit and fill. Choose color and select black. Click okay to fill the screen with black. Duplicate the layer. Once this is done, go to filter, render, and lens flare. Make sure the lens flare is in the center. Edit the settings to your liking. Click okay to add the effect on to the image. Go to filter, disto...

How To: Do a partial black and white photo in Photoshop
In this video, we learn how to turn a photo partially black and white using PhotoShop. First, open up the program and open up the picture you'd like to change. Now, click with the right key above the layer and choose duplicate "layer". Now click above the eye icon to hide the layer, then select the layer. Now you can go to image, adjustments, then black and white. Now make the second layer visible and select the eraser tool. Wave your brush over everything but what you want to keep colorful. ...
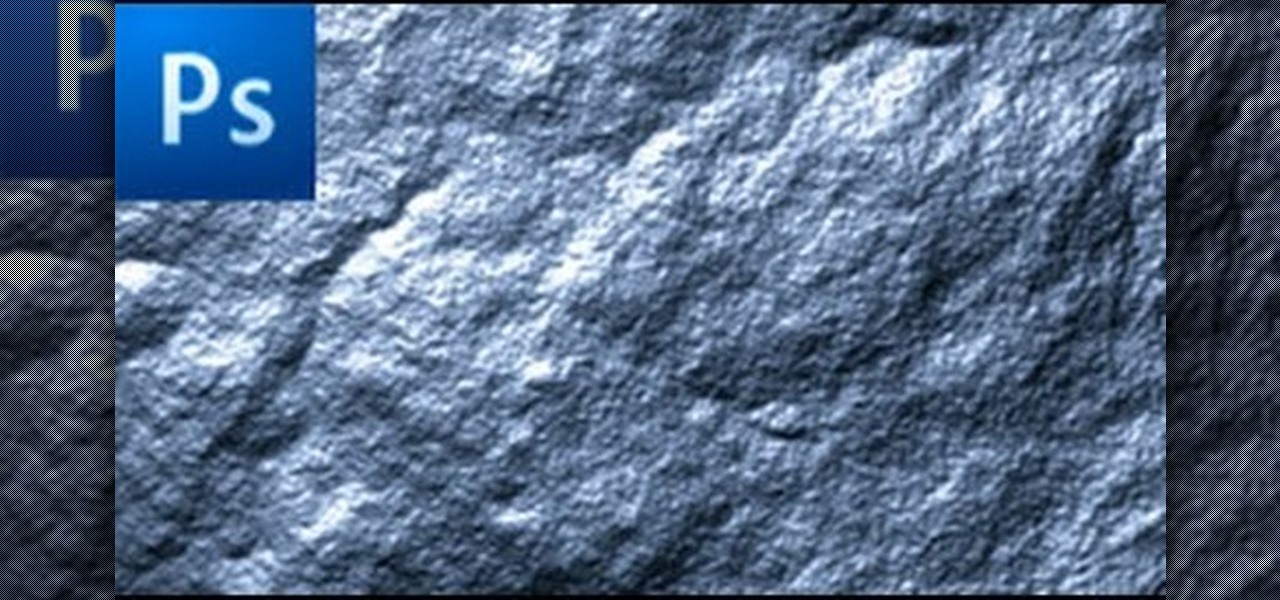
How To: Create a realistic rock texture using Photoshop
In this how to video, you will learn how to create a rock texture in Photoshop. First, open the program. Select your foreground as a gray color and the background as a darker gray. Go to filter and render clouds. Go to filter and noise to add noise. Add about 3 percent and click okay. Add a channel and click filter. Apply the difference clouds multiple times until you get something very dark. Add more noise and then fade the add noise filter. Go back to the original layer and go to filter and...
How To: Whiten your teeth in a photo using Photoshop
In this how to video, you will learn how to whiten teeth in Photoshop. First, open an image that you want to edit in Photoshop. Zoom in to the teeth as much as you can. Next, go to the brush tool and set the diameter to 21. Hold shift and q to put you into quick mask mode. Now paint over the teeth with your brush. Whatever is red will be your selection. Once you are done painting the teeth, select press shift and q again. Go to select and choose inverse. Next, go to image and adjustments and ...
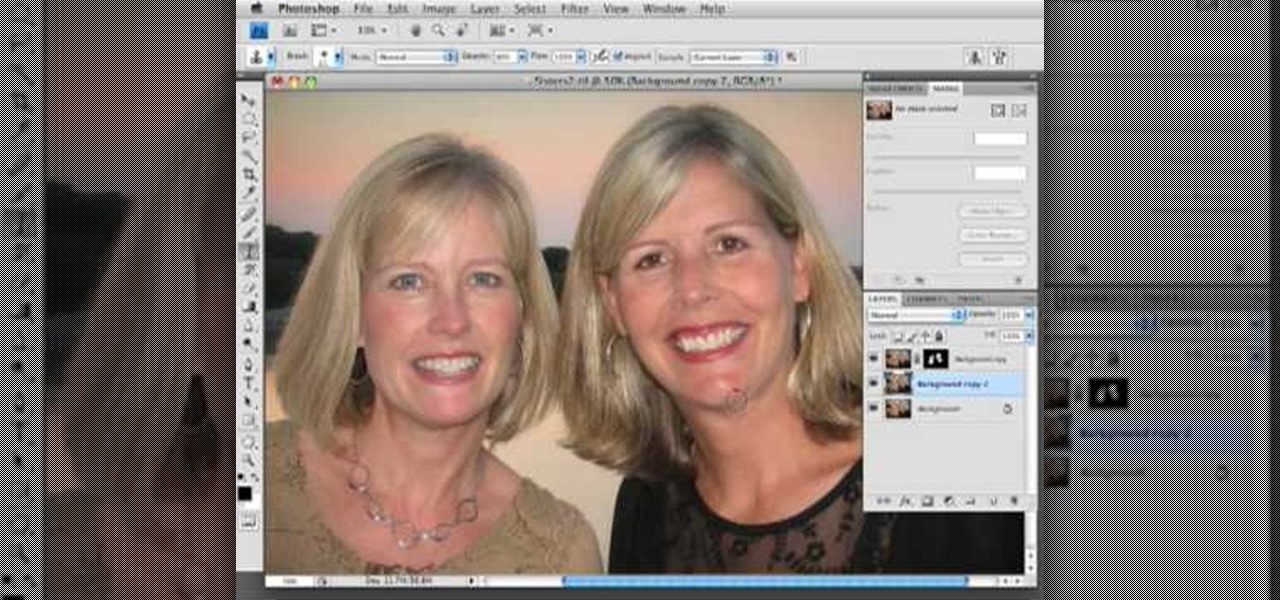
How To: Get rid of the shine on your face with Photoshop
In this how to video, you will learn how to get rid of shine using Photoshop. This is useful if you took a picture using too much flash, causing shine to appear on the faces of those in the photo. First, open the image in Photoshop. Duplicate the background layer. Select the clone stamp tool on the left and select a brush with no hardness. From here, change the opacity to 80 percent. Click the option key on an area of cheek. Now, click on the dots of shine on the faces. This can be used on wr...
How To: Make a photo black and white with colored parts
This video teaches us to make a photo black and white with coloured parts in Photoshop. This procedure consists of many steps. In the first step, we choose the magnetic lasso tool from the application. This is followed by the second step. In the second step, we draw the contours of the places we want to stay colored in the photo. Press the 'Shift' key to keep the contours selected while drawing contours across multiple places in the image. After drawing the contours, go to step three. Right c...
How To: Sharpen your images using Photoshop
Howard demonstrates how to control sharpening on your image in Photoshop. First, you want to copy your layer by dragging to down to the new layer icon at the bottom of the box. Next, go up to the menu bar at the top of the screen and click Filter, select Sharpen, and go to Unsharp Mask. A dialogue box will pop up so that you can adjust the how sharp your image is by using the sliders. Click OK when you are done. If you want adjust where you sharpen the picture go to the right side and click o...

How To: Make up the eyes with digital eyeshadow
In this video, we learn how to put eyeshadow onto a picture using PhotoShop. First, open up the program and open your picture. Click on layer then new the click layer again.On the new layer put as blend mode "multiply". Make the opacity 50% and choose a color. Then select the brush that is the right size for your picture. Next, you will be able to brush the mouse over the eyelid and put eyeshadow onto the lid of the eye. You can change the intensity of the eyeshadow by changing the opacity hi...